How to Use a Telescope for Beginners? Reflector and Refractor
To use a reflector telescope, the first step is to find a dark location with minimal light pollution. Allow the telescope to cool down to the ambient temperature to prevent image distortion caused by heat. Reflector telescope should be set up on stable ground using a tripod. The eyepiece lens should then be inserted into the focuser. The telescope can be moved using the slow-motion controls on the mount. To center your target celestial body, use the crosshairs of a finderscope. The image can be focused by adjusting the focuser knob, and it may need to be refocused as you switch between eyepieces. It’s recommended to start with bright objects like the Moon or planets like Jupiter and Saturn.
To use a refractor choose an area with minimal light pollution and a clear view of the sky. Look through the finder scope and locate your target object. Adjust the telescope’s altitude and azimuth knobs until the object is centered in the finder scope’s crosshairs. It’s advised to start with the lowest power eyepiece for a wider field of view. The image sharpness can be adjusted using the focusing knob on the telescope. Similar to the reflector telescope, star charts or astronomy apps can be used to identify objects in the night sky and plan your observing sessions. For more detailed views, magnification eyepieces can be used.
How to use a reflector telescope?
To use a reflector telescope, follow these 10 steps.
- Find a dark location with minimal light pollution
- Allow the telescope to cool down to ambient temperature
- Set up the tripod on stable ground
- Insert the eyepiece lens into the focuser
- Use the slow-motion controls on the mount to move the telescope
- Align finderscope with the main telescope
- Focus the image by adjusting the focuser knob
- Refocus as you switch between eyepieces
- Start with bright objects like the Moon or planets like Jupiter and Saturn
- Use star charts or astronomy apps to locate fainter objects
1. Find a dark location with minimal light pollution
Use online light pollution maps like Dark Site Finder or Light Pollution Map to identify suitable locations near you. These websites provide interactive maps that show the level of light pollution in your area, helping you find the best places to use your telescope.
Mobile apps like SkySafari or Star Walk help locate dark areas and provide information on visible celestial objects, making it easier for beginners to plan their stargazing sessions.
Consider the Bortle Scale rating when choosing a location. This scale measures the brightness of the night sky, with Class 1 being the darkest and Class 9 the brightest. Aim for a location with a rating of 2 or lower to ensure optimal darkness for using your reflector telescope.
2. Allow the telescope to cool down to ambient temperature
The primary mirror in a reflector telescope needs to match the ambient air temperature. Larger aperture mirrors tend to take longer to cool down due to their increased surface area. To facilitate cooling, you can use fans to blow air over the mirror, helping it dissipate heat more efficiently. Ensure not to direct the airflow directly onto the mirror or create turbulence, as this can cause image distortion.
The cooling time required for a reflector telescope varies based on its mirror diameter. Telescopes with mirror diameters up to 200 mm need 30 minutes to an hour to cool down. Those with mirror diameters between 200 mm and 400 mm may require 1-2 hours, while telescopes with mirror diameters above 400 mm can take 2-3 hours or more to reach the ambient temperature.
To track the temperature of your reflector telescope, use a thermometer to measure the primary mirror, tube, and ambient air temperature. Wait for the telescope to cool down to within 1-2°C of the ambient temperature. This process may take several hours, depending on the initial temperature difference and the telescope’s design.
Verifying the reflecting surface temperature is crucial before observing. Use an infrared thermometer or temperature probe to ensure the temperature difference is within ±1°C. Following these steps will help minimize thermal distortion and ensure optimal image quality for a better observing experience. A temperature difference of 2-3°C can cause significant image degradation, so it’s essential to be patient and allow the telescope to reach the correct temperature before use.
3. Set up the tripod on stable ground
Choose a stable location for your reflector telescope. This location should be a flat, level, and firm surface that can support the weight of both the telescope and the tripod.
Follow the manufacturer’s instructions for the assembly of the tripod. This involves attaching the tripod legs to the tripod head and extending the legs to the desired height. Ensure that the legs are evenly spread to provide a stable base for the telescope.
Level tripod using a built-in bubble level or a separate leveling tool. This step is crucial for accurate telescope operation and prevents image distortion. Make sure the tripod is perfectly horizontal before proceeding.
Secure the tripod legs by tightening all screws and bolts. This step prevents any movement or vibration during use and ensures the legs are firmly secured and stable.
Place pavers or heavy paving stones under the tripod legs to add stability and mass. Hang a weight, such as a gallon jug of water or sand, from the tripod legs or underside of the mount head to lower the center of gravity. Use vibration dampening pads under the tripod legs to absorb shocks and vibrations. Attach counterweights to the mount to increase overall mass and stability.
4. Insert the eyepiece lens into the focuser
Gently push the eyepiece into the focuser, ensuring it is fully seated. The barrel should be flush with the focuser’s rim. You may hear a slight click as the eyepiece engages, indicating that it’s correctly positioned.
Secure the eyepiece. If your reflector telescope has a thumbscrew or retaining ring, tighten it to hold the eyepiece in place. This ensures that the eyepiece remains stable during use, providing a clear and consistent view.
Throughout this process, it’s essential to handle both the eyepiece and focuser with care. This prevents scratching or damaging the optics, which could negatively impact the performance of your reflector telescope. Always follow the manufacturer’s instructions for specific models, as some may have unique requirements.
5. Use the slow-motion controls on the mount to move the telescope
Controls, marked as “RA” (Right Ascension) and “DEC” (Declination), allow for precise adjustments in the telescope’s position. Before using these controls, ensure the RA and DEC clutch knobs are tightened to engage the slow-motion control cables or rods.
To move the telescope in the Right Ascension (east-west direction), use the RA control. Turn the control clockwise to move the telescope east and counterclockwise to move it west. Each click of the control corresponds to a movement of 1-2 arcminutes, which is 1/60 of a degree. This level of precision is crucial when looking at celestial objects, such as planets or during an eclipse. Remember, it’s vital to use a solar filter when observing the sun to protect your eyes from harmful light.
For adjustments in the Declination (north-south direction), use the DEC control. Turn the control clockwise to move the telescope north and counterclockwise to move it south. Similar to the RA control, each click corresponds to a movement of 1-2 arcminutes.
6. Align finderscope with the main telescope
To center your target celestial body in the finderscope of a reflector telescope, the first step is to identify and locate the finderscope. The finderscope is a small telescope that is attached to the main telescope tube. It is mounted on the side or top of the reflector telescope. The finderscope plays a crucial role in helping you locate and center the object in the main telescope’s field of view.
To align the finderscope with the main telescope, start by loosening the finderscope’s adjustment screws. This will allow for smooth movement of the finderscope. Point the telescope at a bright, easy-to-see object, such as the Moon or a planet. Look through the finderscope’s eyepiece and identify the object. Then, use the adjustment screws to move the finderscope so that the object is centered in its field of view. Once the object is centered, tighten the adjustment screws to secure the finderscope in place.
Use the main telescope to locate your target celestial body. Look through the main telescope’s eyepiece and use the telescope’s slow-motion controls or altitude and azimuth adjustments to bring the object into view. Once you have located the object, center it in the main telescope’s eyepiece using the main telescope’s adjustments.
Look through the finderscope’s eyepiece and adjust the finderscope so that the target celestial body is centered on the crosshairs or reticle. You may need to loosen the adjustment screws to move the finderscope for precise centering.
7. Focus the image by adjusting the focuser knob
To achieve a clear and sharp image in a reflector telescope, it is essential to adjust the focuser knob correctly. This knob manipulates the position of the eyepiece or camera sensor relative to the focal plane, a process often referred to as “focusing” or “focusing the image.”
Begin the focusing process by loosening the focuser knob and moving the eyepiece holder or secondary mirror to its closest position to the primary mirror. This initial adjustment ensures that the image is not too far out of focus. Look through the eyepiece and turn the focuser knob clockwise. This action moves the eyepiece holder or secondary mirror away from the primary mirror, bringing the image into rough focus.
Continue to turn the focuser knob clockwise in small increments, about 1/8 to 1/4 of a turn, while observing the image through the eyepiece. The image should become sharper with each adjustment. Make very small adjustments, about 1/16 of a turn, until the image becomes sharp and clear.
The focuser knob moves the eyepiece holder or secondary mirror by about 1-2 inches (2.5-5 cm) along the optical axis. To achieve a sharp focus, you may need to adjust the focuser knob by as little as 0.01-0.05 inches (0.25-1.25 mm) at a time.
8. Refocus as you switch between eyepieces
Ensure that your telescope is already in focus using the current eyepiece. Once you have confirmed this, carefully swap the eyepieces, making sure to securely seat the new eyepiece in the eyepiece holder. This step is crucial, as a poorly seated eyepiece can lead to collimation issues and hinder your viewing experience.
Turn the knob clockwise to move the mirror closer or counterclockwise to move it away. Keep in mind that even small adjustments can significantly impact the focus, so make incremental changes and check the image through the new eyepiece after each adjustment.
If your reflector telescope has a fine-focus knob, use it to fine-tune the focus further. This knob allows for more precise adjustments, ensuring that you achieve the sharpest image possible.
9. Start with bright objects like the Moon or planets like Jupiter and Saturn
Start with a low-power eyepiece (20-30 mm) to get a wider view of the object in space. As you gain more experience, you can switch to higher-power eyepieces (10-15 mm) for more detailed views. The magnification formula (magnification = telescope focal length / eyepiece focal length) can help you calculate the best magnification for your viewing needs.
Use a star chart or planetarium software to find the Moon, Jupiter, or Saturn. These celestial bodies are visible to the naked eye and relatively easy to locate. Once you’ve identified your target, use the telescope’s finder scope to align it with the object. Adjust the telescope’s altitude and azimuth controls to center the object in the eyepiece.
Look through the eyepiece and make necessary adjustments to the focus. Be patient, as it may take a few minutes to get a sharp image. When observing the Moon, look for craters, mountains, and phases. For Jupiter, you should be able to see its major cloud bands and some of its larger moons, such as Io, Europa, Ganymede, and Callisto. When viewing Saturn, the rings and its largest moon, Titan, should be visible.
Ensure steady atmospheric conditions for finer details. Adjusting your telescope’s collimation can help achieve sharper views. Collimation is the process of aligning the telescope’s mirrors to provide the best possible images.
10. Use star charts or astronomy apps to locate fainter objects
Star charts and astronomy apps are invaluable tools for beginners, in locating fainter celestial objects when using a reflector telescope. One such app is SkyPortal, which is particularly useful for those using telescopes like the Celestron PowerSeeker or the Bushnell reflecting telescope.
Astronomy apps, including SkyPortal, simulate the night sky in real-time, providing an accurate representation of the exact positions of celestial objects. These apps can be calibrated to your specific location, time, and even your telescope’s specifications, making them a personalized guide to the night sky.
Apps include databases of astronomical objects, such as galaxies, nebulas, and star clusters, along with information on their brightness, size, and distance. This information helps in planning your stargazing session and methodically locating and observing fainter objects.
Many of these apps offer features like “Tonight’s Best” or “Observing List.” These features generate a list of objects visible in your sky, prioritized by brightness and visibility, helping you focus on the most accessible targets for your reflector telescope.
How to use a Dobsonian telescope?
To use a Dobsonian telescope, follow these 8 steps.
- Choose an open area with a clear view of the sky
- Point the telescope tube towards your target in the sky
- Look through the finder scope
- Adjust the altitude and azimuth knobs of the telescope until the object is centered in the finderscope
- Center the object in the main eyepiece by adjusting the knobs
- Use the eyepiece with the longest focal length for a wider field of view
- Switch to higher magnification eyepieces for a closer look
- Turn the knob on the telescope tube until the image appears sharp
1. Choose an open area with a clear view of the sky
Select a large, open area with an unobstructed view of the sky. This allows users to take full advantage of their telescope’s capabilities and observe a wide variety of celestial objects.
Avoid places with buildings, trees, or power lines that could block portions of the sky. These obstructions can limit the visibility of certain celestial objects and hinder the overall observing experience. By choosing an open area, beginners can use their small telescopes to their full potential and explore the wonders of the night sky.
Consider elevated sites, such as hills or mountains. Elevated sites reduce atmospheric interference and increase the clarity of observations. Even a small elevation of 10-15 meters (30-45 feet) can make a significant difference.
2. Point the telescope tube towards your target in the sky
Identify the celestial object you want to look at. This could be a planet, star, galaxy, or nebula. Once you’ve chosen your target, it’s time to determine its coordinates. You can do this by using a star chart, planisphere, or planetarium software, which will provide you with the object’s right ascension and declination.
Measure the target’s altitude (angle above the horizon) and azimuth (compass direction) at your specific location and time. This information can be found using the same tools that provided the coordinates.
Use the telescope’s altitude (up/down) axis, match the target’s altitude above the horizon. The altitude is measured in degrees (°), and you can use a planisphere, star chart, or planetarium software to find this information.
Rotate the telescope’s azimuth (left/right) axis to the correct compass direction. The azimuth is measured in degrees (°) from true north (0°). You can use a compass or a planisphere to measure the azimuth.
3. Look through the finder scope
Look through the finder scope and move the telescope until the object appears in the finder scope’s field of view. This may take some time and patience, especially if you’re new to using a Dobsonian telescope. Once the object is centered in the finder scope’s crosshairs, look through the main telescope’s eyepiece. The object should already be centered in the main telescope’s field of view.
Check and adjust the finder scope’s alignment as needed. With practice, you’ll become more comfortable using the finder scope and it will become an invaluable tool in your exploration of the night sky.
As National Geographic notes, using a finder scope can be a mind-blowing experience, especially when combined with an iPhone adapter for astrophotography. So, set up your tripod, follow these instructions, and get ready to explore the universe one star at a time.
4. Adjust the altitude and azimuth knobs of the telescope until the object is centered in the finderscope
Turn the altitude knob to move the telescope up or down until the object is centered in the finderscope’s field of view. This knob controls the telescope’s elevation. After adjusting the altitude, turn the azimuth knob to move the telescope left or right. This knob adjusts the telescope’s compass direction. Continue making small, iterative adjustments to both knobs until the object is perfectly centered in the finderscope.
Once you’ve centered the object in the finderscope, look through the main telescope’s eyepiece to verify its position. If the object is not centered, make further small adjustments to the altitude and azimuth knobs and re-check.
Adjust the altitude and azimuth tension knobs. This will ensure the telescope moves smoothly. Additionally, you can perform a drift alignment by centering a star and letting it drift to check the polar alignment.
5. Center the object in the main eyepiece by adjusting the knobs
The altitude adjustment knob controls the vertical motion of your telescope, allowing you to move it up or down. Use this knob to center the object vertically within your eyepiece. The key to successful centering is making small, incremental adjustments.
Once the object is centered vertically, turn your attention to the azimuth adjustment knob. This knob controls the horizontal motion of your telescope, allowing you to move it left or right. Use this knob to center the object horizontally within your eyepiece.
Fine-tune your adjustments. Alternate between the altitude and azimuth knobs, making small adjustments as needed to keep the object centered in your eyepiece. Continuously check the object’s position and make further adjustments as necessary. This process of fine-tuning, known as collimation, ensures that your telescope’s components are perfectly aligned, providing you with the clearest image possible.
6. Use the eyepiece with the longest focal length for a wider field of view
When observing through a Dobsonian telescope, it is practical to start with the longest focal length eyepiece. This approach makes it easier to locate and center objects in the field of view. Longer focal length eyepieces are particularly useful for viewing large deep sky objects and the full moon.
Using an eyepiece with a longer focal length offers several benefits. It allows you to observe larger areas of the sky, making it easier to locate and observe objects. Although longer focal length eyepieces may reduce magnification and image brightness, they provide a wider field of view that enhances the overall stargazing experience.
7. Switch to higher magnification eyepieces for a closer look
Once the object is centered and in focus, you can switch to a higher magnification eyepiece. Select an eyepiece with a shorter focal length, 10-15 mm, for higher magnification. Carefully remove the low power eyepiece from the focuser and insert the higher magnification eyepiece. Secure the eyepiece by tightening the thumbscrew or locking mechanism to prevent it from moving during observation.
After inserting the higher magnification eyepiece, you may need to adjust the focus. This adjustment compensates for the difference in eyepiece focal length and ensures the image remains sharp and clear. Higher magnifications amplify atmospheric distortions, so use higher powers only when seeing conditions are excellent.
Consider the telescope’s maximum useful magnification. A rule of thumb is that the maximum useful magnification is around 50x per inch of aperture. For example, an 8″ telescope can go up to around 400x magnification. Avoid exceeding this limit to prevent image distortion.
8. Turn the knob on the telescope tube until the image appears sharp
Turn the focus knobs slowly. The image should start to come into sharp focus. If you cannot reach focus, you may need to pull out the eyepiece or use an extension tube. Once the image is sharp, go past the sharpest focus until the image starts to blur. Then, reverse the direction of the focus knob to hit the precise point of best focus. Make small adjustments to keep the image sharp.
Loosen the focus knob by rotating it counterclockwise to make focus adjustments. This allows the focuser to move freely. Move the focuser slowly while looking through the eyepiece. As you approach the focal point, the image will change. Once you reach the optimal point, tighten the focus knob by rotating it clockwise to secure the focuser in place.
A longer focal length requires more precise adjustments. Similarly, larger apertures provide sharper images but require precise focus adjustments. Remember that seeing conditions, such as light pollution or turbulent air, can make achieving a sharp focus challenging, especially in city environments.
Make small, incremental adjustments, about 1-2 mm at a time. Observe the image, moving the knob in one direction until the image sharpens, then reverse if it begins to blur. Repeat this process to narrow down the optimal focus point.
How to use a refractor telescope?
To use a refractor telescope, follow these 7 steps.
- Choose an area with minimal light pollution and a clear view of the sky
- Look through the finder scope and locate your target object
- Adjust the telescope’s altitude and azimuth knobs until the object is centered in the finder scope’s crosshairs
- Start with the lowest power eyepiece for a wider field of view
- Use the focusing knob on the telescope to adjust the image sharpness
- Use star charts or astronomy apps to identify objects in the night sky and plan your observing sessions
- Use magnification eyepieces for more detailed views
1. Choose an area with minimal light pollution and a clear view of the sky
Consider visiting certified Dark-Sky Preserves or Sanctuaries. These locations, certified by the International Dark-Sky Association (IDA), have minimal artificial light pollution, making them ideal for using a telescope. The IDA works diligently to protect these areas from the encroaching light pollution of nearby cities and towns, ensuring that the night sky remains as dark and clear as possible.
Use Bortle Scale for finding dark sky locations. This scale measures the darkness of the sky, with lower classes indicating less light pollution. Aim for locations with a Bortle Class of 2 or lower. These sites will provide you with the darkest skies and the best opportunities for stargazing.
The Light Pollution Map and the Dark Site Finder use satellite data to map light pollution levels across the globe. Simply enter your location or the location you’re interested in, and these tools will provide a map with light pollution levels categorized into different Bortle Classes.
2. Look through the finder scope and locate your target object
Use a star chart, planetarium software, or a mobile app to identify the target object’s location in the sky. Point the telescope in the general direction of the target object.
Look through the finder scope’s eyepiece, keeping both eyes open if possible. The finder scope’s wider field of view makes it easier to acquire objects. Move the telescope until the target object is centered on the finder scope’s crosshairs or reticle.
3. Adjust the telescope’s altitude and azimuth knobs until the object is centered in the finder scope’s crosshairs
Adjust the altitude knob to move the object up or down within the finder scope’s crosshairs. Turning the knob clockwise will move the object down, while turning it counterclockwise will move it up. This knob is used to adjust the telescope’s vertical positioning, an essential function for accurate viewing.
Adjust the azimuth knob to move the object left or right within the crosshairs. Similar to the altitude knob, turning the azimuth knob clockwise will move the object to the right, while turning it counterclockwise will move it to the left. This knob controls the horizontal positioning of the telescope, another critical aspect for precise viewing.
Fine-tune the position of the object within the crosshairs. This can be achieved by making small, incremental adjustments to both the altitude and azimuth knobs, switching between the two as needed until the object is precisely centered.
4. Start with the lowest power eyepiece for a wider field of view
Insert the chosen lowest power eyepiece into the telescope’s focuser. This will give you a broader view of the celestial object or region you are observing. Starting with the lowest power eyepiece offers several benefits, such as making it easier to locate and center objects, observing larger objects like nebulae or star clusters in their entirety, and getting a better sense of the object’s surroundings and relationships to other celestial bodies.
Once you have located and centered the object using the lowest power eyepiece, you can incrementally switch to higher magnification eyepieces for more detailed views. This method makes it easier to find, center, and study objects, as compared to starting with a very high power, narrow field eyepiece.
5. Use the focusing knob on the telescope to adjust the image sharpness
Start with a rough focus by looking through the eyepiece and turning the focusing knob clockwise or counterclockwise until the image appears to be roughly in focus. This initial step helps you get closer to the optimal focus point. That the direction of adjustment is crucial; turning the knob clockwise moves the lenses closer together, while turning it counterclockwise moves them farther apart.
For refractor telescopes with an aperture of 60-80 mm, a 1-2 mm adjustment can make a significant difference in image sharpness. Turn the focusing knob in small increments and observe the image through the eyepiece. Evaluate the image sharpness after each adjustment, looking for a clear, well-defined edge around the object you’re observing. If the image appears blurry or distorted, continue adjusting the focusing knob in small increments until you achieve the desired level of sharpness.
Use a bright star to verify that the image is in optimal focus. Observe the star through the telescope and adjust the focusing knob until the star’s image appears as a sharp, symmetrical point. This method is particularly helpful when using high magnification eyepieces or when observing distant celestial objects like planets or the Moon.
6. Use star charts or astronomy apps to identify objects in the night sky and plan your observing sessions
Choose a reliable star chart or astronomy app such as SkySafari, Stellarium Mobile, or Star Walk. You can use a physical star chart like the Sky & Telescope Pocket Sky Atlas. Input your specific location and the date and time of your observing session into the app or chart. This will generate a customized sky map, providing accurate visibility forecasts for your area.
Filter the list of celestial objects to show only those suitable for refractor telescopes. These may include planets, double stars, star clusters, and nebulae. Prioritize objects by brightness and altitude above the horizon. Focus on the brightest and most accessible objects first, as they will be easier to locate and observe.
Create an observing list by selecting 5-10 objects to target during your session. Consider factors like object type, brightness, and altitude. Make note of the recommended telescope settings, such as magnification and eyepiece requirements, for each object.
During your stargazing session, use the app or star chart to locate each object on your list. These tools will provide detailed information on the object’s position, movement, and visibility. Orient yourself by identifying recognizable star patterns near your target objects.
7. Use magnification eyepieces for more detailed views
To achieve more detailed views with a refractor telescope, you can utilize different magnification eyepieces by swapping them out to adjust the magnification power. This process allows you to optimize the view for various celestial targets by balancing magnification needs with field of view and image clarity.
Calculating magnification is essential to determine the ideal eyepiece for your observing needs. You can calculate magnification by dividing the telescope’s focal length by the eyepiece’s focal length. The formula is as follows: Magnification = Telescope Focal Length (mm) ÷ Eyepiece Focal Length (mm). For instance, if your refractor telescope has a focal length of 900mm, using a 10mm eyepiece would result in a magnification power of 90x (900mm ÷ 10mm = 90x).
When selecting eyepieces, it’s important to understand that lower focal length eyepieces provide higher magnification, while longer focal length eyepieces offer lower magnification. For example, using a 5mm eyepiece with a 900mm focal length telescope would yield a magnification power of 180x (900mm ÷ 5mm = 180x). Conversely, a 20mm eyepiece would provide a magnification power of 45x (900mm ÷ 20mm = 45x).
Experienced astronomers often recommend having a few key eyepieces in your collection, such as a low power wide-field eyepiece for finding objects, a medium power eyepiece for general viewing, and a high power narrow-field eyepiece for detailed planetary observations. Additionally, a Barlow lens can be used to effectively double or triple the magnifying power of your existing eyepieces.
Are Telescopes From Different Brands Used Differently?
Yes, telescopes from different brands are used differently, because different brands utilize unique construction and functionalities. These unique aspects influence how one uses the telescope. For example, Celestron, Gskyer, National Geographic, Bushnell and Meade are similar telescope brands but employ unique features that impact their use.
Celestron often features advanced computerized “Go-To” systems in their higher-end models, such as the NexStar telescopes. This system automatically locates and tracks celestial objects, making the stargazing experience smoother. The interface and setup process will vary from other brands, making it essential for users to familiarize themselves with the particular software and hand control associated with these scopes.
Gskyer is known for offering affordable telescopes most suitable for beginners. They often provide a sturdy build, albeit with manual controls instead of computerized systems. Many Gskyer telescopes, such as those in their refractor series, utilize an altazimuth mount. This requires the user to adjust the telescope’s position manually in both vertical and horizontal directions. Due to the more manual nature of these telescopes, understanding the basics of alignment and tracking becomes crucial.
The National Geographic line of telescopes is generally geared towards beginners and educational endeavors. These telescopes often come with unique features, like smartphone adapters, allowing budding astronomers to capture their discoveries. The build tends to be more user-friendly with clear markings and simpler controls. However, because these telescopes are primarily used by beginners, they lack some of the advanced features or customization options available in more professional brands.
Bushnell is a brand commonly associated with binoculars and sports optics, but their venture into telescopes offers users straightforward and durable options. While the build is robust, Bushnell telescopes often lean on the simpler side with manual controls. Their reflector telescopes, for instance, need regular collimation due to the use of mirrors. This process will require a steeper learning curve for beginners. However, once mastered, this leads to enhanced clarity and sharper images.
Meade telescopes, particularly the LX series, often incorporate advanced technologies like AutoStar, a computerized system similar to Celestron’s “Go-To.” This allows for automated tracking of celestial objects. The Audiostar handbox is another feature unique to some Meade models, which provides educational audio clips about celestial objects. While the brand offers a broad range of telescope types, each has specific setup and usage instructions that users must acquaint themselves with for optimal performance.
Each brand and type carries its own nuances in the way the telescope is constructed and used, resulting in a unique observational experience for each.
Is There a Difference in Use Between Types of Telescopes?
Yes, there is a difference in Use between types of telescopes. Different types of telescopes are categorized by their optical design and come with distinct usage and maintenance nuances. These variations between reflector, refractor and compound telescopes, as well as their subtypes, will impact the overall observation experience.
Refractor telescopes use lenses to gather and focus light. The primary lens sits at the telescope’s front, channeling light to the eyepiece at the back. Their straightforward design means fewer complications in setup and use. This simplicity makes refractors a go-to choice for beginners. While they are robust and need minimal upkeep, refractors typically shine in lunar, planetary, and double-star observations. However, the cost is generally higher per inch of aperture when juxtaposed with reflectors.
On the other hand, reflector telescopes, often known as Newtonians, employ mirrors. Incoming light reflects off a primary mirror at the base and then off a secondary mirror, directing the light to an eyepiece on the side. The key thing with reflectors is understanding collimation — the process of adjusting mirrors for perfect alignment. Given their open design, they are more vulnerable to dust and need more frequent cleaning. In terms of advantages, reflectors are generally more cost-effective, providing brighter images for the same price point as refractors, though they do ask for more hands-on maintenance.
Compound telescopes, or catadioptrics, meld features from refractors and reflectors. They employ both lenses and mirrors, offering compact designs and versatile viewing capacities. Notably, they are less prone to optical aberrations. Popular compound variations include the Schmidt-Cassegrain and Maksutov-Cassegrain. While they are more user-friendly, particularly for astrophotography, they are generally pricier than their counterparts.
For newcomers, refractor telescopes stand out for their simplicity and ease of use. Their straightforward design coupled with minimal upkeep makes them attractive. Reflectors offer greater value in terms of observation but require more hands-on care. Compound telescopes, with their blended features, offer broad observational capabilities, but they come with a steeper price tag. The best telescope to use will depend on personal experience, budget and conditions.
What are the Ideal Conditions to Use a Telescope?
The ideal conditions for using a telescope are clear skies, low atmospheric turbulence, minimal light pollution, stable temperatures and timing.
Clear skies are fundamental because clouds, fog, or haze obscure celestial objects, diminishing the quality of observations. Low atmospheric turbulence ensures that stars appear as steady points of light rather than twinkling. This steadiness is essential for distinguishing details on planets and other celestial bodies.
Light pollution, emanating from artificial lighting in urban areas, hampers the visibility of faint stars, nebulae, and galaxies. Observing from a location far from city lights will significantly enhance the clarity and contrast of celestial objects.
Stable temperatures are crucial as fluctuating conditions lead to the formation of tube currents inside the telescope. These currents distort the image, especially when observing objects at high magnification.
The time of observation plays a role. For instance, when observing the moon, its phase and position in the sky impact visibility. A first-quarter moon, for example, is best observed in the early evening, offering a detailed view of lunar craters, mountains, and valleys due to the shadows cast at this phase.
How to Use a Telescope at Nighttime?
To use a telescope at nighttime, one must consider proper positioning, acclimatization, moon phase and environmental concerns.Nighttime, in the context of telescopes and astronomy, refers to the period post-astronomical twilight, when the sun has dipped far enough below the horizon to ensure the sky is sufficiently dark. This darkness is paramount for the optimal observation of celestial bodies, especially those that are fainter, such as distant galaxies or nebulae.
When using a telescope at nighttime, positioning is crucial. It’s vital to ensure the telescope is set up in an area free from artificial light pollution. Artificial lights, like those from streets or houses, introduce glare and significantly diminish the contrast of the celestial object in view. This is particularly relevant for planets where extraneous light obscures detailed features.
Another consideration is the telescope’s acclimatization. Telescopes, especially those with substantial mirrors or lenses, require time to adapt to the ambient night time temperature. Failing to allow this adjustment results in temperature variations inside the telescope, causing visual distortions and a lack of clarity in the image.
The choice of celestial objects during nighttime is expansive, but the phase of the moon will also influence the quality of observations. The brightness of the moon impacts the visibility of fainter objects. The moon’s luminance generally impedes the viewing of distant stars or galaxies, but planetary observation remains less affected.
Lastly, dew formation is a common concern during nighttime observations. As temperatures drop, moisture accumulates on the telescope’s optics, impacting visibility. Utilizing tools like dew shields or heaters mitigates this issue, ensuring clear, uninterrupted viewing.
Can You Use a Telescope During the Daytime?
Yes, it is possible to use a telescope during the daytime. Daytime, as it pertains to telescope usage, refers to the interval between sunrise and sunset when the sun illuminates the Earth.
However, there are specific considerations and precautions to be aware of. First, one should never point a telescope directly at the sun without specialized solar filters, as this poses a severe risk of permanent eye damage. It’s also crucial to ensure that anyone using or near the telescope is informed about this hazard.
Using a telescope during the daytime primarily limits the observer to terrestrial or solar observations. Celestial objects, such as stars, are generally not visible due to the sun’s overpowering brightness. Terrestrial viewing provides amplified, detailed visuals of distant landscapes, buildings, or wildlife.
If aiming to observe the sun, specialized solar telescopes or solar filters for regular telescopes are necessary. These devices permit safe viewing by filtering out harmful ultraviolet and infrared radiation and reducing the sun’s brightness to a safe level. Observers are then able to witness solar phenomena such as sunspots, solar flares, or solar prominences.
How to find celestial bodies easily?
The first and the biggest challenge a stargazer faces is to move the telescope to find out the things in the sky in the first few trials. As it is magnifying the celestial bodies, it gets difficult to find out the thing the observer wants to observe. If you move the telescope just an inch in any direction, the whole view moves a long way in the sky. Here are some techniques on how you can find things easily and use the telescope smoothly on your first hand.

Fig 1: The different parts of a telescope you should know.
- First, choose any object from nearby on the earth like a tree, a remote house or beacon and point your telescope at that.
- Then look at the object through the finderscope. If your object is right at the center of the crosshairs of the tiny finderscope, then the setup of the telescope is done. If the object is not in that position then loosen the screws on the finderscope and fix it again so that the object is right in the crosshairs.
- Before looking through the big telescope, look for the object through the finderscope first. It will make finding the object through the big telescope much easier.
How to use different eyepieces?
It is a good idea to start observing the sky with the lowest power eyepieces. Because according to the rule of thumbs, the greater the power of the eyepiece, the smaller the little lens is. It is better to work with a larger lens at the beginning. When you will get used to handling or managing this little lense, you will be able to handle the tinier lens later.
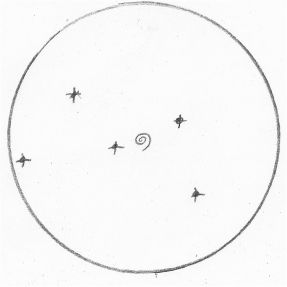
Fig 2: Picture of telescope view of while using lowest power eyepiece
When you use the lowest power eyepiece, you can see more sky than the higher power eyepiece just like the picture above. Assume that the circle is the circumference of the view you can see through the telescope. The swirly thing is the object you want to find and the others are stars.
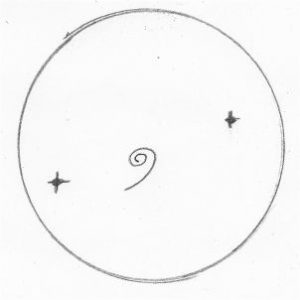
Fig 3: Picture of telescope view of while using higher power eyepiece
But this picture above shows the view when we fit a higher power eyepiece in the telescope. If you notice, you will see that this view shows less stars than the previous. That means it is displaying less area of the sky compared to the previous one. But it is not needed to say that it is easy to move the telescope around to find the swirly object when we can see the larger area of the sky. Because as you see a smaller portion of the sky, small movement of the telescope moves the view a lot which makes it challenging to find the objects.
This is why one should begin the observation with the lowest power eyepiece. Once the object is detected and centered in the view, then the observer can change the eyepiece and fit the higher power eyepiece to have a closer look.
List of the sky objects you can observe with a telescope
If you own a telescope for the first time in your life, you can start looking at objects that can easily be detected from nearby. I assure you that you will have an awesome experience. Here is the list of such objects you can observe on the first nights.
- The Moon- This is the most spectacular thing you can explore on the first night you hold a telescope. You will be able to see a more clear view of the surface of the moon with craters. But keep in mind that you should watch it when it is half or less. You will get a clear view then. Otherwise, the light of the moon will obscure the view. The smaller the moon, the larger the shadows and the better the view with craters.
- The Planets- Our own solar system has 8 completely different planets which are unique in their look and the characteristics. Point your telescope to the Jupiter, and you will see the four moons moving around it and the extraordinary bands right across the middle of the planet’s surface. Turn your telescope to Saturn, and you will be able to witness the amazing ring surrounding it. With the cheaper telescope, the views may not be well defined, but you will be able to detect them. You will be able to look at the red planet Mars and the bright planet Venus too. Explore them and understand our own solar system with your own telescope.
- The Galaxies- Our solar system is at one arm of our galaxy Milky Way. With your telescope, you may see the other part of our galaxy. Besides, you also can find the M31 Galaxy looks like a spiral cotton ball which is in the constellation of Andromeda pretty easily. For this, locate the galaxies on a star map and then try to find it in the night sky with a telescope.
- Star Clusters- Though you might have to locate this on the map before and look for it in the night sky, it is not difficult to have a look at some of the star clusters. In the Constellation of Hercules, you will find a nice cotton ball which is actually a star cluster named M13. You may even be able to specify the individual stars too.
If you just follow the techniques and know how to apply them, your inexpensive and tiny telescope can give you an unbelievably great experience.