
How to Use a Telescope (Step by Step Guide for Beginners)
A telescope is an optical instrument designed to observe distant celestial objects. Telescopes have types, each with specific setup requirements and basic operational principles. Eyepieces are crucial components of telescopes, allowing for magnification and focus adjustments. Use a telescope by following a step-by-step guide tailored for beginners.
Setting up a telescope requires preparation and attention to detail. Extend the tripod legs to a stable height, between 3 feet (0.91 meters) to 5 feet (52 meters), depending on your viewing comfort. Level the tripod using a bubble level to ensure stability and tracking of celestial objects. Attach the telescope mount to the tripod head using the provided screws or clamps.
Proper alignment is crucial for stargazing. Align the finder scope with the telescope tube by centering a distant object in both views. Orient the telescope to the north using Polaris as a reference point. Point the telescope at your desired celestial object using the slow-motion controls on the mount.
Selecting an eyepiece is essential for viewing. Start with a power eyepiece, 25mm (0.98 inches) or 32mm (26 inches) focal length, for easier object location. Focus the image by adjusting the focuser knobs until the view becomes sharp and clear. Collimate the telescope if necessary, following the manufacturer’s instructions.
The best time to use a telescope is during clear, dark nights with minimal light pollution. Wait 30 minutes after sunset for astronomical twilight to begin. New moon nights offer ideal conditions for observing faint objects. The hours between 2:00 AM and 3:00 AM provide a stable atmosphere for sharper images.
To use a telescope, follow these step-by-step instructions.
- Set up the telescope outdoors on a flat surface.
- Align the finder scope with the main optics.
- Point the telescope at an object using the finder scope.
- Look through the eyepiece and adjust the focus knobs for clarity.
- Center the object using the slow-motion controls.
- Experiment with eyepieces to observe details.
- Use star charts or apps to locate and identify celestial objects.
- Allow your eyes to adjust to the darkness for better viewing.
1. Set up the tripod and telescope
To set up a telescope start with extending the tripod legs to a stable height, between 3-5 feet (0.91-52 meters). Level the tripod using the built-in bubble level. Attach the telescope mount to the tripod head. Secure the telescope tube to the mount using the provided screws or clamps.
Align the finder scope with the main telescope tube using adjustment screws. Orientate the telescope to north by aligning it with Polaris, the North Star. Point the telescope to your desired celestial object using slow-motion controls or setting circles.
2. Adjust the tripod legs to level the telescope
Place the tripod on a flat, stable surface. Extend the tripod legs to your desired viewing height. Adjust leg lengths to level the telescope. Loosen the leg locks on each tripod leg. Extend or retract the legs as needed to achieve a level position. Tighten the leg locks after adjusting each leg.
Use a bubble level to check the alignment of the tripod head. Place the bubble level on the tripod head and observe its position. Tune the leg adjustments until the bubble is centered in the level. Tighten all locks and screws on the tripod legs and head. Recheck the level before mounting the telescope to ensure stability.
3. Align finder scope and telescope
Point the main telescope at a stationary object like a telephone pole or mountain peak. Center the chosen object in the telescope’s eyepiece using low magnification. Adjust the finder scope without moving the telescope. Locate the same object in the finder scope’s field of view. Use the adjustment screws on the finder scope to center the object in its crosshairs.
Verify the alignment by checking both the telescope eyepiece and finder scope views. The object is centered in both fields of view. Repeat the process with objects at varying distances for accuracy. Fine-tune the alignment at night using celestial objects like the Moon or stars. Navigate to areas of the sky to ensure alignment across the celestial sphere.
Orientate the finder scope to match the telescope’s view if the image appears inverted or reversed. Consult your telescope’s manual for instructions on your finder scope’s alignment system. Re-align the finder scope, especially after transporting the telescope. Use low-power eyepieces in both the telescope and finder scope for easier object location during alignment.
4. Select eyepiece for magnification
Determine the telescope’s focal length before selecting eyepieces. Desired magnification levels vary for different celestial objects. Use the telescope’s focal length and desired magnification to select an eyepiece.
You can calculate the required eyepiece focal length by dividing the telescope’s focal length by the desired magnification. A 1000mm (39.37 inches) focal length telescope requires a 10mm (0.39 inches) eyepiece to achieve 100x magnification. Field of view considerations are relevant when choosing eyepieces for observing objects like nebulae or star clusters.
Install the selected eyepiece in the telescope’s focuser. Focuser adjustments achieve a sharp image. Observers turn the focuser to fine-tune the focus and magnification. Magnification verification occurs by observing objects.
5. Find a star or planet to see
To locate a star or planet with your telescope start with acclimatizing your eyes to darkness for at least 30 minutes before observing. Align and orientate your telescope according to the manufacturer’s instructions.
Star charts or astronomy apps help locate celestial targets. Begin with identifiable objects like the Moon or planets as Venus or Jupiter. Look for reference stars or constellations to guide you to your desired target.
Turn and adjust the telescope to point at the desired object using the mount’s controls. Use the finder scope to align the main telescope with the target. Look through the eyepiece and fine-tune the focus using the focus knob. Gradually move to challenging targets as you gain experience. Telescopes are designed to magnify and resolve objects, allowing for detailed observations.
6. Aim the telescope in the direction of the star or planet
Aiming the telescope begins with using the finder scope. The finder scope allows sighting the area of the target object. Slewing the telescope to the position follows after locating the area. Fine-tuning the aim involves using slow-motion controls for precise positioning.
Focusing the telescope is essential for clear views. Adjusting the focuser knob sharpens the image in the eyepiece. Tracking features, if available, must be activated to follow the object’s motion. Computer-guided telescopes require inputting location data for accurate tracking. Low-power eyepieces provide wider views, aiding in locating objects. Practice improves observing skills over time, enhancing the ability to aim.
7. Look through the eyepiece and work the focus knob
Look through the eyepiece by positioning your eye close to, but not touching, the lens. Adjust your viewing position for comfort while maintaining a clear line of sight.
Turn the focus knob to sharpen the image. Work the knob back and forth to find the point of focus. The image will become clearer as you approach the correct focal point. Tune the adjustment by making small incremental changes to the focus knob. Sharp details indicate proper focus has been achieved. Use the focus knob as a guide for observations. The position of focus will be similar for objects at similar distances.
8. Observe the object through the eyepiece and enjoy the view
Maximize your viewing experience by experimenting with eyepieces. Low-power eyepieces provide wider fields of view, while high-power eyepieces offer greater magnification. Observe the object’s details, including shape, size, color, and features.
Walk around the telescope to find a comfortable viewing position. Provide yourself with a chair for extended observation sessions. Use star charts or planetarium software to understand the context of the object.
What is the best time to use a telescope?
The best time to use a telescope is on clear, cloudless nights between midnight and morning hours when the sky is dark and atmospheric conditions are stable for viewing. Clear skies provide good viewing conditions for telescopes. Starlight becomes visible without artificial light pollution or moonlight. Evenings with a moon phase offer ideal telescope viewing opportunities. Observers enjoy the best experience around 2-3 am when the atmosphere reaches its stable state. Stable atmospheric conditions allow for sharper images of objects in space.
After sunset, telescope users wait 30 minutes before beginning their observations. Astronomical twilight represents the darkest period of the night, offering favorable viewing conditions. The period between midnight and 3 am, known as “zero-dark-thirty,” provides the best time for telescope use due to dark skies and stable atmospheric conditions.
New moon days offer good conditions for telescope users to observe celestial objects. A moon makes observing faint objects through telescopes difficult. Autumn, winter, and spring seasons provide the best conditions for telescope nights, with longer periods of darkness and clearer skies.
Cloudless nights provide the best opportunities for stargazers to use telescopes. Minimal light pollution enhances the visibility of celestial objects. Bright skies make observing faint objects through telescopes challenging. Telescope users allow their eyes to adjust to darkness for 20 minutes before observing to maximize their viewing experience.
Can you use a telescope during the day?
You can use a telescope during the day to observe objects like the sun, moon, and planets, but proper precautions and solar filters are essential to ensure safe viewing. Solar filters are essential to protect the eyes and telescope from sunlight. Daytime observations include bright celestial bodies like Venus and Jupiter. Nebulas require nighttime viewing due to their faint nature. Telescopes enable daytime sightings of bright nebulas like the Orion Nebula. Proper positioning away from direct sunlight ensures effective daytime telescope use.
Can you use a telescope in the city?
You can use a telescope in the city, light pollution from streetlights limits the ability to observe dimly lit celestial objects, with better viewing conditions in areas with darker skies. Urban environments reduce visibility of faint stars and galaxies. Streetlights and other artificial lighting sources overwhelm the night sky, making it difficult to observe lit celestial objects. Good viewing conditions require access to skies away from city centers. Better options for stargazing exist in rural areas or designated dark sky reserves. Astronomers recommend seeking locations at least 20-30 miles (32-48 kilometers) outside urban areas for telescope use.
Can you use a telescope through a window?
Using a telescope through a window is possible but not advisable, as the glass distorts the view and introduces turbulence, affecting image clarity and observation quality. Window glass introduces imperfections that distort the telescope view. Turbulence between the window and outside environment impacts image clarity. Wide aperture telescopes minimize window distortion effects to some extent. Glass types affect telescope viewing quality, with soda-lime glass causing chromatic aberration and distortion. Clean windows are essential for telescope viewing, as dirt and smudges exacerbate image degradation.
How to find celestial bodies easily?
The first and the biggest challenge a stargazer faces is to move the telescope to find out the things in the sky in the first few trials. As it is magnifying the celestial bodies, it gets difficult to find out the thing the observer wants to observe. If you move the telescope just an inch in any direction, the whole view moves a long way in the sky. Here are some techniques on how you can find things easily and use the telescope smoothly on your first hand.

Fig 1: The different parts of a telescope you should know.
- First, choose any object from nearby on the earth like a tree, a remote house or beacon and point your telescope at that.
- Then look at the object through the finderscope. If your object is right at the center of the crosshairs of the tiny finderscope, then the setup of the telescope is done. If the object is not in that position then loosen the screws on the finderscope and fix it again so that the object is right in the crosshairs.
- Before looking through the big telescope, look for the object through the finderscope first. It will make finding the object through the big telescope much easier.
How to use different eyepieces?
It is a good idea to start observing the sky with the lowest power eyepieces. Because according to the rule of thumbs, the greater the power of the eyepiece, the smaller the little lens is. It is better to work with a larger lens at the beginning. When you will get used to handling or managing this little lense, you will be able to handle the tinier lens later.
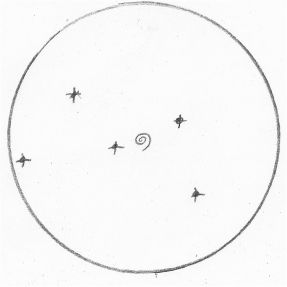
Fig 2: Picture of telescope view of while using lowest power eyepiece
When you use the lowest power eyepiece, you can see more sky than the higher power eyepiece just like the picture above. Assume that the circle is the circumference of the view you can see through the telescope. The swirly thing is the object you want to find and the others are stars.
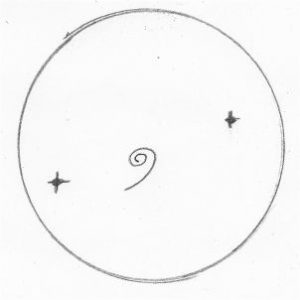
Fig 3: Picture of telescope view of while using higher power eyepiece
But this picture above shows the view when we fit a higher power eyepiece in the telescope. If you notice, you will see that this view shows less stars than the previous. That means it is displaying less area of the sky compared to the previous one. But it is not needed to say that it is easy to move the telescope around to find the swirly object when we can see the larger area of the sky. Because as you see a smaller portion of the sky, small movement of the telescope moves the view a lot which makes it challenging to find the objects.
This is why one should begin the observation with the lowest power eyepiece. Once the object is detected and centered in the view, then the observer can change the eyepiece and fit the higher power eyepiece to have a closer look.
List of the sky objects you can observe with a telescope
If you own a telescope for the first time in your life, you can start looking at objects that can easily be detected from nearby. I assure you that you will have an awesome experience. Here is the list of such objects you can observe on the first nights.
- The Moon- This is the most spectacular thing you can explore on the first night you hold a telescope. You will be able to see a more clear view of the surface of the moon with craters. But keep in mind that you should watch it when it is half or less. You will get a clear view then. Otherwise, the light of the moon will obscure the view. The smaller the moon, the larger the shadows and the better the view with craters.
- The Planets- Our own solar system has 8 completely different planets which are unique in their look and the characteristics. Point your telescope to the Jupiter, and you will see the four moons moving around it and the extraordinary bands right across the middle of the planet’s surface. Turn your telescope to Saturn, and you will be able to witness the amazing ring surrounding it. With the cheaper telescope, the views may not be well defined, but you will be able to detect them. You will be able to look at the red planet Mars and the bright planet Venus too. Explore them and understand our own solar system with your own telescope.
- The Galaxies- Our solar system is at one arm of our galaxy Milky Way. With your telescope, you may see the other part of our galaxy. Besides, you also can find the M31 Galaxy looks like a spiral cotton ball which is in the constellation of Andromeda pretty easily. For this, locate the galaxies on a star map and then try to find it in the night sky with a telescope.
- Star Clusters- Though you might have to locate this on the map before and look for it in the night sky, it is not difficult to have a look at some of the star clusters. In the Constellation of Hercules, you will find a nice cotton ball which is actually a star cluster named M13. You may even be able to specify the individual stars too.
If you just follow the techniques and know how to apply them, your inexpensive and tiny telescope can give you an unbelievably great experience.