The Sun Through a Telescope


Viewing the Sun through a telescope can be a fascinating experience, but it’s crucial to prioritize safety to protect your eyes from potential damage. Looking directly at the Sun through a telescope without the appropriate protective equipment is extremely dangerous and can cause severe damage to the eyes, including permanent blindness. Concentrated sunlight can burn the retina, and ordinary sunglasses, neutral density filters, and improvised filters are not sufficient to protect your eyes.
The best filter for viewing the Sun through a telescope is a high-quality, full-aperture solar filter that meets the ISO 12312-2 international safety standard. These filters are designed to fit over the front of your telescope, blocking 99.99% of the Sun’s visible light and 99.999% of its ultraviolet (UV) and infrared (IR) radiation. A specific recommendation is the Celestron EclipSmart Solar Filter, which is certified safe for direct viewing of the Sun by the International Organization for Standardization (ISO).
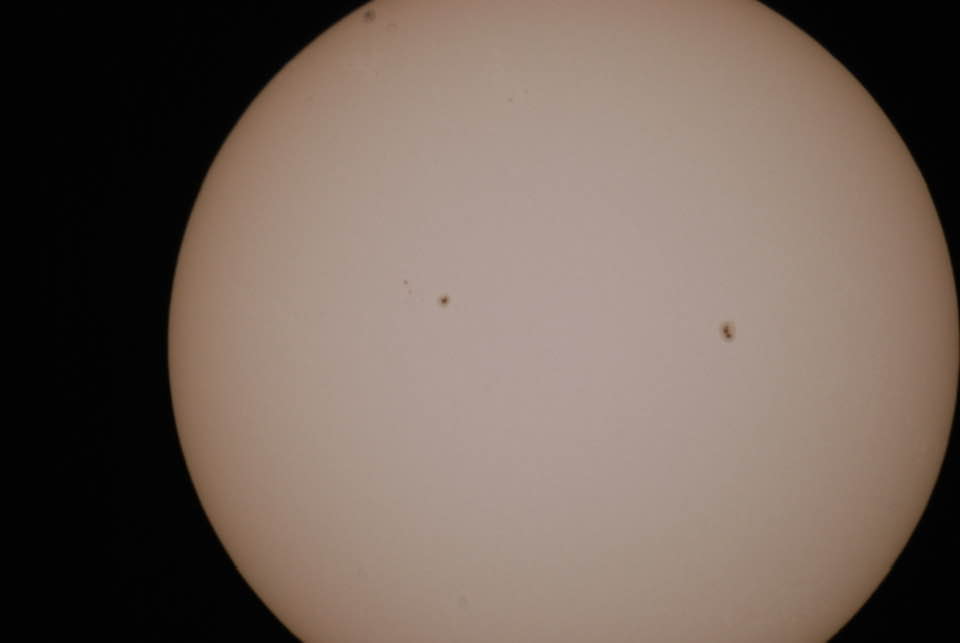
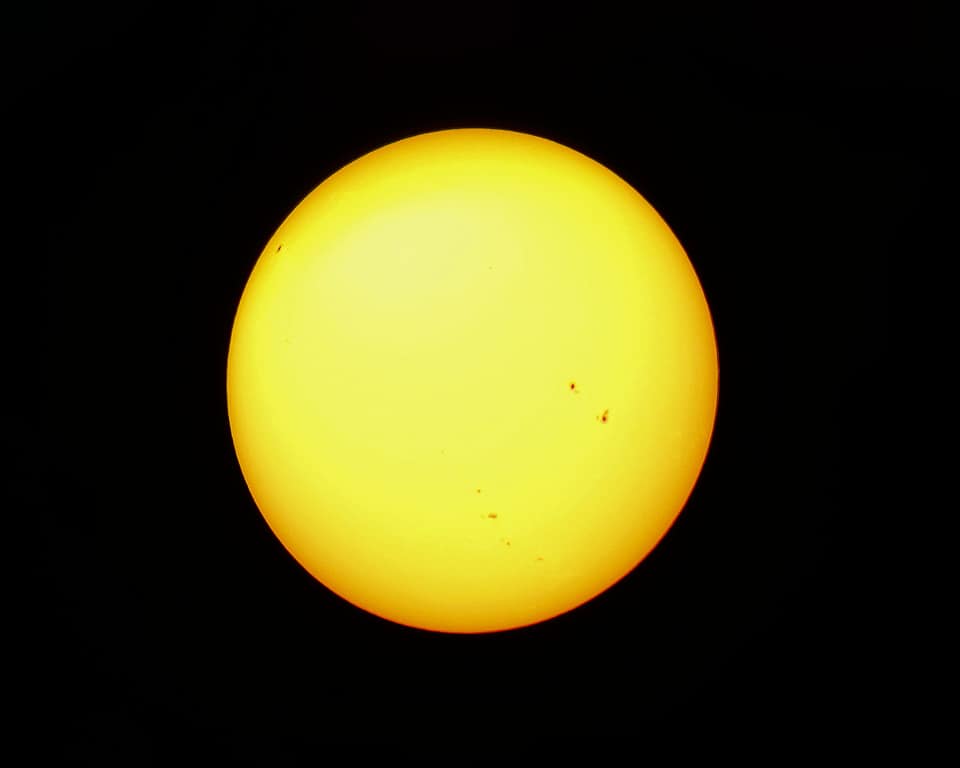
When viewed through a telescope with a proper solar filter, the Sun appears as a bright, blazing disk with a granular texture on its surface. This texture is the result of the turbulent convection of hot plasma beneath the surface. Detailed features like sunspots, which are darker, cooler regions on the Sun’s surface caused by intense magnetic activity, become visible. The Sun’s surface, known as the photosphere, looks like a boiling cauldron of hot, glowing gas.
To see the Sun with a telescope, start by using a proper solar filter that covers the front aperture of the telescope. Never look at the Sun through an unfiltered telescope eyepiece. Find the Sun’s position in the sky using a sundial or a planetarium app, then align the telescope with this position. Use a finder scope or a reflex sight to align the telescope with the Sun without looking directly at it. Start with a low magnification (20-30x) and gradually increase as needed. Always remember to prioritize safety when viewing the Sun through a telescope.
Can you look at the Sun with a telescope?
Looking directly at the Sun through a telescope without the appropriate protective equipment is extremely dangerous and should never be attempted. The intense light and radiation from the Sun can cause severe damage to the eyes, including permanent blindness. Concentrated sunlight can burn the retina, the light-sensitive tissue at the back of the eye.
The danger lies in the fact that looking at the Sun through a telescope magnifies its intensity. Ordinary sunglasses, neutral density filters, and improvised filters are not sufficient to protect your eyes. They are not designed to handle the Sun’s concentrated rays when viewed through a telescope. Use specialized equipment designed specifically for observing the Sun.
There are safe ways to observe the Sun through a telescope. One method is to use a dedicated solar telescope or attach a full-aperture solar filter to your telescope. These filters are designed to block most of the Sun’s intense visible light and all harmful UV and IR radiation. Another method is to project the Sun’s image onto a surface. This can be done by pointing the unfiltered telescope at the Sun and letting the focused light fall on a white sheet of paper or card. This method, known as projection, allows you to see the Sun’s image without looking directly at it through the eyepiece. For a more detailed view of the Sun’s chromosphere, specialized solar telescopes with narrow-band hydrogen-alpha filters can be used.
What happens if you look at the Sun with a telescope?
Looking directly at the sun through a telescope without the appropriate filters leads to severe and permanent eye damage or even blindness. This happens because the concentrated sunlight from the telescope can literally burn the retina and other sensitive eye tissues. Even a brief glance is extremely dangerous and can cause irreversible damage. The telescope lenses themselves can overheat, crack, or shatter from the intense sunlight. The consequences can be instantaneous and irreversible blindness.
The Sun’s surface brightness is about 13.6 million candelas per square meter, which is far beyond the safe viewing limit. The energy density of the Sun’s radiation is about 3.8 × 10^26 watts per square meter. When this energy is focused through a telescope, it can cause instantaneous damage to the retina. Thermal damage to the retina can lead to a condition called solar retinopathy, which can result in blind spots, distorted vision, or even total blindness.
The Sun’s surface temperature is about 5,500°C (9,900°F), emitting a tremendous amount of energy in the form of visible and ultraviolet (UV) radiation. When you look at the Sun through a telescope, the concentrated sunlight would increase the energy density on your retina by a factor of 100 to 1,000 times, depending on the telescope’s magnification and aperture. This would cause instantaneous damage to the photoreceptors in your eyes, leading to blindness.
Can you see the sun at night with a telescope?
You can’t see the sun at night with a telescope. The sun is only visible during the daytime when it is above the horizon.
During night hours the sun is positioned on the opposite side of the Earth. Its visibility is confined to specific periods of the day, which are influenced by the observer’s location and the time of year. The opportunity to watch the sun through a telescope is restricted to these daylight hours.
Telescope cannot enable you to see the sun once it has set. The sun’s position below the horizon signifies that it is no longer visible from your location, regardless of the telescope’s capabilities. Telescopes are tools for observing celestial bodies that are currently above the horizon, and not for viewing objects that have set.
What is the best Sun filter for telescope?
The best filter for viewing the sun through a telescope is a high-quality, full-aperture solar filter that meets the ISO 12312-2 international safety standard. These filters are designed to fit over the front of your telescope, blocking 99.99% of the sun’s visible light and 99.999% of its ultraviolet (UV) and infrared (IR) radiation. By reducing the sun’s intense radiation to a safe level, full-aperture solar filters ensure a secure and enjoyable viewing experience. Brands such as Baader, Orion, and Celestron offer these filters, with glass filters providing better contrast and film filters being a more economical choice.
A specific recommendation for the best sun filter for telescopes is the Celestron EclipSmart Solar Filter. This high-quality, precision-made glass filter has a neutral density of 5.0, reducing the sun’s intensity by 99.999%. With a clear aperture of 90mm and a thread size of 102mm, it is compatible with a wide range of telescopes, including those from Meade. The Celestron EclipSmart Solar Filter is certified safe for direct viewing of the sun by the International Organization for Standardization (ISO) and meets the ISO 12312-2 standard for solar viewing. This filter is designed for viewing the sun’s surface details, sunspots, granules, and prominences, providing a clear and sharp image.
Alternative options for sun filters include the Herschel Wedge for refracting telescopes and Hydrogen-Alpha (Ha) filters. The Herschel Wedge, when combined with a continuum filter, provides the highest contrast views of the solar surface and sunspots for white light solar observation. For more advanced solar observation, Hydrogen-Alpha (Ha) filters with a bandwidth of 0.7 Ångström (Å) allow for detailed views of the sun’s disk and prominences. These filters are ideal for serious solar observers due to their high-contrast views of the sun’s features. An example of a highly recommended Ha filter telescope is the Meade Coronado Personal Solar Telescope (PST).
How to make a homemade solar filter for telescope?
To make a homemade solar filter for telescope, follow the steps listed below.
- Gather Baader AstroSolar Film, cardboard/foam board, aluminum/PVC pipe, double-sided tape/glue, scissors/craft knife, ruler/straightedge, pencil/marker.
- Cut cardboard/foam board into a square/circle larger than your telescope’s aperture.
- Draw and cut out a center shape on the cardboard/foam board matching the size of your telescope’s aperture to create a ring.
- Cut a piece of Baader AstroSolar Film larger than the filter holder’s center shape.
- Attach the solar viewing film to the filter holder using double-sided tape/glue, centering it carefully.
- Attach the aluminum/PVC pipe to the filter holder to create a ring that fits snugly over the telescope’s aperture.
- Inspect the filter by shining a bright light through it to check for any pinholes or defects.
- Attach the filter to your telescope by placing it over the aperture and securing it with tape, glue, or a filter ring.
- Always prioritize safety when viewing the sun, and use a filter that meets the ISO 12312-2 international safety standard.
Begin by getting Baader AstroSolar Film (or an equivalent solar viewing film) to serve as the ailter. This film is specifically designed for safe solar viewing. Next, obtain a piece of cardboard or foam board to create the filter holder, and an aluminum or PVC pipe to form the filter ring. You’ll need double-sided tape or glue, scissors or a craft knife, a ruler or straightedge, and a pencil or marker.
To create the filter holder, cut a piece of cardboard or foam board into a square or circle that is larger than your telescope’s aperture. Draw a circle or square in the center of the cardboard, matching the size of your telescope’s aperture. Then, cut out the center shape to create a ring.
Cut a piece of the Baader AstroSolar Film into a square or circle that is larger than the filter holder’s center shape. Ensure that the film is large enough to cover the entire aperture of your telescope.
Assemble the filter by using double-sided tape or glue to attach the solar viewing film to the filter holder, centering it carefully. Attach the aluminum or PVC pipe to the filter holder to create a ring that fits snugly over the telescope’s aperture.
Inspect filter by shining a bright light through it to check for any pinholes or defects. Once you’re confident that the filter is safe for use, attach it to your telescope by placing it over the aperture and securing it with tape, glue, or a filter ring.
With the filter securely attached, you can now look at the sun through your telescope for a safe and enjoyable solar viewing experience. Remember never to look directly at the sun without a proper solar filter, as doing so can cause serious eye damage or blindness.
What does the Sun look like through a telescope?
The sun presents a breathtaking, dynamic, and complex image when viewed through a telescope. Sun appears as a bright, blazing disk with a granular texture on its surface. This texture is the result of the turbulent convection of hot plasma beneath the surface, creating a mottled or granular appearance. The pictures revealed through telescopes show intricate patterns and structures, offering a unique glimpse into the intense energy and activity at the heart of our solar system.
When viewed using a telescope with a proper solar filter, detailed features like sunspots become visible. Sunspots are darker, cooler regions on the sun’s surface, about 1,500 km (930 miles) in diameter, caused by intense magnetic activity. They have a darker central umbra and a lighter penumbra region surrounding it. The sun’s surface (photosphere) looks like a boiling cauldron of hot, glowing gas. This is due to convective cells of hot plasma (granules) rising to the surface and cooling before sinking back down. Granules are about 1,000 km (620 miles) in diameter and create a mottled, irregular pattern of bright and dark regions.
High-resolution images from advanced solar telescopes reveal the incredibly turbulent, “boiling” appearance of the sun’s surface. The surface temperature is about 5,500°C (9,900°F), and the light we see is emitted at this temperature. The sun’s color appears white or yellowish when viewed through a telescope. The images reveal a dynamic, turbulent surface with features such as granules, sunspots, faculae, and prominences.
Faculae are brighter, hotter regions that appear as streaks or patches near sunspots. Prominences are large, loop-like structures of hot, dense gas that erupt from the sun’s surface and are often visible above the limb (edge) of the sun. The sun’s appearance when viewed through a telescope is a dynamic, ever-changing display of intense heat and energy.
How to see the Sun with a telescope?
To see the Sun with a telescope, follow the steps listed below.
- Prioritize safety to protect your eyes from potential damage.
- Use a proper solar filter that covers the front aperture of the telescope.
- Never look at the Sun through an unfiltered telescope eyepiece.
- Find the Sun’s position in the sky using a sundial or a planetarium app.
- Align the telescope with the Sun’s position.
- Make the telescope’s shadow on the ground as small as possible to aid alignment.
- Lock the telescope in place to prevent any accidental movement.
- Use a finder scope or a reflex sight to align the telescope with the Sun without looking directly at it.
- Start with a low magnification (20-30x) and gradually increase as needed.
- Consider using a telescope specifically designed for solar viewing.
- Alternatively, use a white-light filter or a specialized hydrogen-alpha telescope.
- Pinhole projection is another method for indirect solar viewing.
- Always remember to prioritize safety when viewing the Sun through a telescope.
- Follow the manufacturer’s instructions and take necessary precautions to avoid any harm.
To see the Sun with a telescope, the first step is to use a proper solar filter. Filter must cover the front aperture of the telescope, ensuring that the sunlight is filtered before it enters and gets magnified. Never look at the Sun through an unfiltered telescope eyepiece, as the concentrated sunlight can cause serious eye damage or even blindness.
To aim the telescope at the Sun, start by finding the Sun’s position in the sky using a sundial or a planetarium app. Align the telescope with this position. One way to do this is by making the telescope’s shadow on the ground as small as possible. Once aligned, lock the telescope in place to prevent any accidental movement.
Using a finder scope or a reflex sight can make the process of aiming the telescope at the Sun safer and easier. These tools allow you to align the telescope with the Sun without looking directly at it, reducing the risk of accidental eye damage.
Once the telescope is aligned, you can look through the eyepiece to view the Sun. Start with a low magnification, such as 20-30x, and gradually increase the magnification as needed. This will allow you to see the Sun’s surface features in stunning detail, including sunspots, granules, and prominences.
There are alternative methods for viewing the Sun. For instance, you can use a telescope specifically designed for solar viewing. These specialized telescopes have a built-in safe solar filter, making them a convenient option for those interested in solar observation. Another option is to use a white-light filter, which allows you to see sunspots. If you’re interested in viewing the Sun’s chromosphere in detail, consider using a specialized hydrogen-alpha telescope. Pinhole projection is another method, where sunlight passes through a small hole onto a screen, allowing for indirect solar viewing.
How to find the Sun with a telescope?
To find the Sun with a telescope, follow the steps listed below.
- Ensure you have a specialized solar filter that covers the front aperture of the telescope.
- Never use a filter that goes over the eyepiece.
- Aim the telescope towards the Sun without looking through it, by making the telescope’s shadow as small as possible.
- Use the telescope’s finder scope or a solar finder to help locate the Sun’s position in the sky.
- Adjust the telescope’s altitude and azimuth controls to bring the Sun’s image into the center of the field of view.
- Adjust the focus to get a clear view of the Sun’s surface.
- Always use a solar filter that meets the ISO 12312-2 international safety standard.
- Ensure the solar filter is securely attached.
- Never look directly at the Sun through the telescope without a proper solar filter.
- Consider using telescopes designed specifically for solar observation.
- Always supervise children when using a telescope to view the Sun.
- Be cautious of telescope accessories that may not provide adequate solar protection.
Ensure you have a specialized solar filter that covers the front aperture of the telescope. This filter is designed to protect your eyes from the Sun’s harmful rays. Never use a filter that goes over the eyepiece, as the concentrated sunlight can crack it.
Without looking through the telescope, aim it towards the Sun. You can do this by making the telescope’s shadow as small as possible, which roughly aligns it with the Sun. Avoid looking directly at the Sun through the telescope without a proper solar filter.
Once you’ve roughly aligned the telescope, use the telescope’s finder scope or a solar finder to help locate the Sun’s position in the sky. These tools project an image of the Sun onto a screen, allowing you to safely find its position.
After locating the Sun, adjust the telescope’s altitude and azimuth controls to bring the Sun’s image into the center of the field of view. Once the Sun’s image is visible, adjust the focus to get a clear view of the Sun’s surface. You may be able to see details like sunspots on the Sun’s surface.
Safety should always be your top priority when viewing the Sun with a telescope. Always use a solar filter that meets the ISO 12312-2 international safety standard. Ensure the solar filter is securely attached to prevent it from falling off during use. Never look directly at the Sun through the telescope without a proper solar filter, as this can cause serious eye damage or blindness.
For a more enhanced viewing experience, consider using telescopes designed specifically for solar observation. These telescopes use narrow wavelength filters like hydrogen-alpha, which highlight different solar features. Always supervise children when using a telescope to view the Sun. Be cautious of telescope accessories that may not provide adequate solar protection.
How to make Sun projection with telescope?
To make Sun projection with telescope, follow the steps listed below.
- Equip telescope with solar filter or Herschel wedge for safety
- Use a telescope with at least 60 mm diameter for clear image
- Opt for small refractor telescope or stop down aperture to reduce heat
- Securely mount telescope and point towards sun without looking directly
- Use low-power eyepiece (20 mm or 30 mm) for larger sun projection
- Place white cardboard/paper screen 1-2 meters from eyepiece
- Adjust focus for sharp, clear sun image on screen
- Ensure screen is perpendicular to optical axis for undistorted image
- Observe sun’s projection, noting sunspots, granules, or other features
- Capture images/videos using camera or smartphone aimed at screen
- Never look directly at sun through telescope or with naked eye
- Prioritize safety, ensure no one looks through eyepiece directly at sun
- Always use appropriate solar filters and follow proper viewing procedures
To safely observe the sun and its fascinating features, using the projection method with a telescope is highly recommended. This technique allows you to project an image of the sun onto a screen, providing a safe and enjoyable viewing experience.
Prepare your telescope by equipping it with a solar filter or a Herschel wedge. These devices reduce the intensity of the sunlight to a safe level, allowing only a small fraction of light to pass through. It is essential to use a telescope with a diameter of at least 60 mm (2.4 inches) to ensure a clear and sharp image. Use a small refractor telescope or stop down the aperture of a larger scope to reduce heat buildup and prevent damage to the eyepiece.
Mount your telescope and point it towards the sun, making sure not to look through the eyepiece directly. Use a low-power eyepiece, such as a 20 mm or 30 mm, to project a larger image of the sun.
Place a white cardboard or paper screen at a distance of about 1-2 meters (3-6 feet) from the eyepiece to create the projection. Adjust the telescope’s focus to make the sun’s image sharp and clear on the screen. Ensure the screen is perpendicular to the optical axis for an undistorted, circular image.
Observe the sun’s projection on the screen, noting any sunspots, granules, or other features. To capture images or videos of the projection, use a camera or smartphone aimed at the screen. Never look directly at the sun through the telescope or with your naked eye, as this can cause serious eye damage or blindness.
Always prioritize safety when observing the sun with a telescope. Ensure that no one looks through the eyepiece directly at the sun, and always use appropriate solar filters and follow proper viewing procedures to avoid eye damage.