Telescope Nerd » How To See » Moon Through Telescope: USA Flag, Landing Site, How to Use

Moon Through Telescope: USA Flag, Landing Site, How to Use

It is not possible to see the American flag on the Moon with a telescope, even with the most powerful telescopes like the Hubble Space Telescope. Telescopes lack the necessary angular resolution to distinguish an object as small as the flag or a landing site on the Moon’s surface. The largest optical telescopes in the world have apertures ranging from only 8 to 10 meters, which is not nearly large enough to resolve an object as small as the flag on the Moon.

The Moon appears as a bright, detailed, and fascinating celestial body with a rugged, airless surface through a telescope. The Moon’s surface is pockmarked with numerous impact craters, ranging from small depressions to massive basins. Prominent mountain ranges, such as the Apennine Mountains, stretch for over 600 kilometers (373 miles) and reach heights of up to 5,000 meters (16,400 feet). The dark, lava-filled basins, known as “seas” or “maria,” appear as large, dark gray or black patches on the Moon’s surface. The Moon’s appearance changes with its phases, and the sun’s angle creates dramatic shadows and highlights on the lunar surface, accentuating the relief of the surface features.

The best telescope to see the Moon is a refractor telescope with an apochromatic lens for high-contrast, sharp images. A lens diameter (aperture) of at least 60mm (2.4 inches) to 100mm (3.9 inches) and a focal length of 700mm (27.5 inches) to 1000mm (39.4 inches) is recommended for detailed views of the moon’s surface. A sturdy and stable tripod, a smooth and precise focuser, and a high-quality eyepiece with high eye relief and a wide field of view are also essential for a clear and immersive viewing experience. Recommended telescopes include the Celestron FirstScope 76, Meade Instruments Infinity 102mm AZ Refractor Telescope, Orion 8945 SkyQuest IV, and Celestron Omni XLT 102.

Can you see the flag on the Moon with a telescope?

It is not possible to see the American flag on the Moon with a telescope. The most powerful telescopes, such as the Hubble Space Telescope, lack the resolution to see the flags due to their small size and the vast distance from Earth. The flags remain intact on the lunar surface but cannot be directly observed from Earth using telescopes or any other means.

The Lunar Reconnaissance Orbiter has taken photos of the flags from orbit around the Moon. These images show the flags still standing at five landing sites. These images were not taken from Earth and do not provide a view of the flags as they would appear through a telescope.


Why can’t you see the flag on the Moon with a telescope?

The American flags planted on the Moon during the Apollo missions are too small and too far away to be seen with a telescope. The flag is approximately 1.5 meters (4.9 feet) tall and 0.9 meters (2.9 feet) wide, and the average distance from Earth to the Moon is about 384,400 kilometers (238,900 miles). To see the flag with a telescope you need a resolution of about 1/1000th of an arc second. This resolution is currently not possible with any visible light telescope, including the Hubble Space Telescope.

The Hubble Space Telescope has a resolution of about 0.05 arcseconds, which translates to about 100 meters per pixel at the Moon’s distance. This means that even if the flag were still flying and not faded or deteriorated from over 40 years of exposure to harsh space conditions, it would still be too small to be seen with the Hubble telescope.

Current technology simply cannot achieve the necessary resolution to observe such small objects on the Moon’s surface. The distance between Earth and the Moon is too great to show the flag in any detail. In order to see the flag, you need a telescope with a resolution that is at least 10 times better than what is currently possible.


Can you see moon landing site with a telescope?

No, it is not possible to see the moon landing sites with a telescope from Earth. The distance and the size of the artifacts left behind make it impossible for even the most powerful telescopes to resolve the details.

The largest telescopes on Earth cannot resolve details as small as the lunar modules and artifacts left behind by the astronauts at a quarter million miles away. The Hubble Space Telescope cannot see the moon landing sites. The lunar modules and artifacts left behind are too small to be seen with even the most powerful Earth-based telescopes.

Lunar orbiting satellites, such as the Lunar Reconnaissance Orbiter (LRO), can image the Apollo landing sites with a resolution of about 0.5 meters per pixel. Telescopes can see the locations of the landing sites, but not the actual artifacts. The astronauts left retroreflectors on the moon, which can be seen by laser telescopes. The actual artifacts left behind, such as the lunar modules and the American flag, cannot be seen through a telescope from Earth.


Can you see the moon lander with a telescoepe?

It is not feasible to see the moon lander with Earth-based telescopes due to insufficient resolution. The lunar lander is much smaller in size compared to the vast distance from Earth, making it impossible to resolve with current technology.

Earth-based telescopes, even the most advanced ones like the Hubble Space Telescope, have an angular resolution of around 0.05 arcseconds. You need an angular resolution of around 0.00001 arcseconds to see a lunar lander. This resolution is far beyond the capabilities of current telescopes. The lunar lander is approximately 10-20 feet in diameter, while the moon is about 239,000 miles away from Earth. The distance is vast, and current technology cannot achieve the required resolution to see the lander.

While telescopes mounted on lunar orbiting satellites can capture low-resolution images of the landing sites, and powerful amateur telescopes can observe the Apollo landing sites, the objects left behind by astronauts cannot be seen. Atmospheric conditions on Earth distort and blur the image. Turbulence and scattering make it extremely challenging to distinguish the lander from the bright lunar surface. The moon’s surface is very bright. The lander is a relatively small object, making it hard to resolve.


What does the Moon look like through a telescope?

Moon appears as a bright, detailed, and fascinating celestial body with a rugged, airless surface through a telescope. The Moon’s large, flat, gray patches, called “maria,” are visible to the naked eye. The Moon reveals subtle shades of gray, mountains, valleys, and other features that are not visible to the weak naked eye.

The Moon’s surface is pockmarked with numerous impact craters, ranging from small depressions to massive basins. Prominent mountain ranges, such as the Apennine Mountains, stretch for over 600 kilometers (373 miles) and reach heights of up to 5,000 meters (16,400 feet). The dark, lava-filled basins, known as “seas” or “maria,” appear as large, dark gray or black patches on the Moon’s surface. The Moon’s surface exhibits a distinct dichotomy between the bright, mountainous highlands and the darker, more rugged lowlands.

The Moon’s appearance changes with its phases. During a full moon, the entire face of the Moon is illuminated by the Sun, and it looks like a large, illuminated disk with detailed views. During the crescent and gibbous phases, shadows cast by mountains and craters provide a sense of depth and dimensionality, making the Moon appear different versus its full phase.

The sun’s angle creates dramatic shadows and highlights on the lunar surface, accentuating the relief of the surface features. The Moon’s surface appears to have different hues, with some regions appearing more brown or reddish due to variations in iron and magnesium content. When the Moon is near the horizon, its light must travel through more of the Earth’s atmosphere, making it appear more distorted and colorful.

The Moon’s surface appears as a bright, airless, and rocky terrain through a telescope. You can look for prominent features like craters. Impact craters like Tycho, Copernicus, and Plato appear as circular depressions with raised rims. Some craters have bright, ray-like systems of ejected material radiating from their centers. The Apennine Mountains form the southeastern edge of the Mare Imbrium and can be seen as a rugged, mountainous region. The dark, lava-filled basins are called seas (maria), and basins like Mare Imbrium, Mare Serenitatis, and Mare Crisium appear as large, dark spots.

The quality of your observations will depend on the telescope’s aperture, magnification, optical quality, and observing conditions (e.g., atmospheric clarity, moon phase, and lunar distance). Small telescopes (60-100 mm diameter) provide moderate detail with magnifications of 20-50x, while larger telescopes (150-200 mm diameter) can achieve magnifications of 100-200x, revealing even more intricate details on the lunar surface.

What is the best telescope to see the Moon?

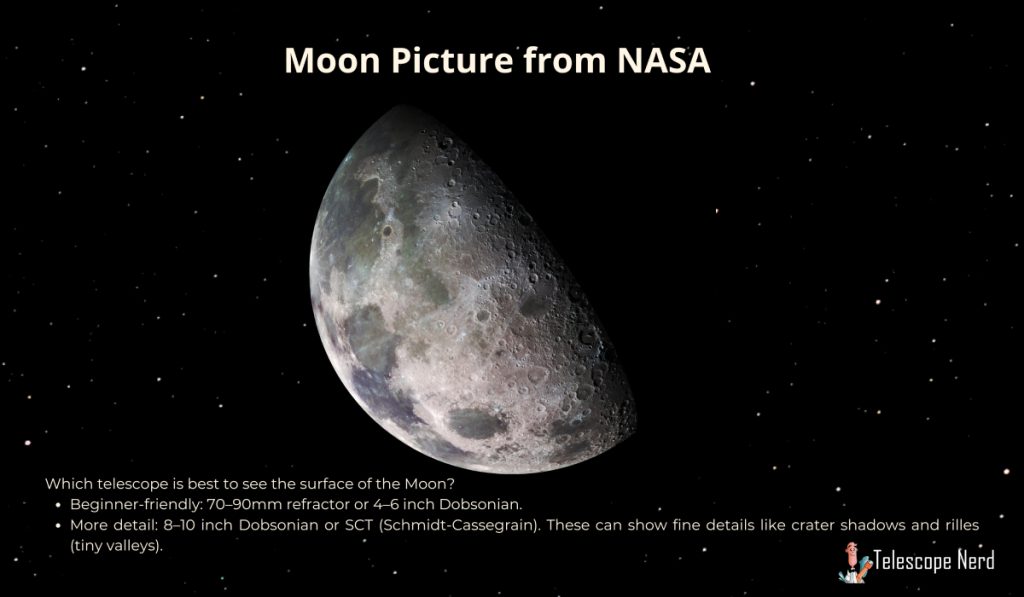
The best type of telescope to use for observing the moon clearly is a refractor telescope equipped with an apochromatic lens. This combination provides a high-contrast image with minimal chromatic aberration, resulting in a sharper and more detailed view of the moon’s surface. You need a telescope with a lens diameter (aperture) of at least 60mm (2.4 inches) to 100mm (3.9 inches) and a focal length of 700mm (27.5 inches) to 1000mm (39.4 inches) to achieve the best view of the Moon.

Several key features should be considered when selecting a telescope for lunar observation. First, a lens diameter of at least 60mm (2.4 inches) is necessary to collect sufficient light and provide a clear image.

Second, a focal length of 700mm (27.5 inches) or more is essential for high magnification and detailed views of the moon’s surface.

Third, a sturdy and stable tripod is crucial for minimizing vibrations and ensuring a clear image. A smooth and precise focuser allows for easy adjustments and contributes to a sharp image.

Lastly, a high-quality eyepiece with high eye relief and a wide field of view is important for a comfortable and immersive viewing experience.

There are four recommended telescopes that fit these criteria and provide excellent views of the moon’s surface.

1. Celestron FirstScope 76: This refractor telescope features a 76mm (3 inches) aperture and a 700mm (27.5 inches) focal length. It comes with a sturdy tripod, making it a great option for those looking for a good view of the moon and other celestial objects.

2. Meade Instruments Infinity 102mm AZ Refractor Telescope: With a 102mm (4 inches) aperture and a 600mm (23.6 inches) focal length, this telescope offers a smooth altazimuth mount for easy tracking of the moon and other celestial objects.

3. Orion 8945 SkyQuest IV: This refractor telescope boasts a 102mm (4 inches) aperture and a 1000mm (39.4 inches) focal length. It includes a sturdy equatorial mount, which is ideal for tracking the moon and exploring other planets.

4. Celestron Omni XLT 102: Featuring a 102mm (4 inches) aperture and a 660mm (26 inches) focal length, this telescope is well-suited for observing the moon’s surface in great detail, as well as other celestial objects.

When choosing the best telescope to see the moon clearly, it’s important to balance aperture size with portability and cost considerations. Keep in mind that optimal atmospheric conditions, such as clear skies, low humidity, and minimal air turbulence, can significantly enhance your lunar observation experience. A larger aperture will allow for more detailed views of the moon’s surface features, making your lunar exploration even more rewarding.


How to use a telescope to see the Moon?

To use a telescope to see the Moon, follow the steps listed below.

  • Ensure your telescope has a diameter of at least 60 mm (2.4 inches) for a clear and detailed view of the lunar surface.
  • Set up your telescope on a sturdy tripod to minimize vibrations and ensure stability.
  • Locate the moon in the night sky, with the crescent or gibbous phases being the best for detailed views.
  • Adjust the telescope’s focus by rotating the focuser knob to make the moon’s image appear sharp and clear.
  • Start with a low magnification (around 20-30x) and gradually increase to 100-200x for more detailed views.
  • Switch between eyepieces with different magnifications to observe various features on the moon’s surface.
  • Make fine adjustments to the telescope’s altitude and azimuth controls to track the moon’s movement.
  • Use a moon filter or a neutral-density filter to reduce the moon’s brightness and enhance the visibility of its surface features.
  • Avoid observing the moon when it is full due to overwhelming brightness.
  • Ensure your telescope is properly collimated and the optics are clean for a clear image.
  • Use an astronomy app or moon chart to help locate and identify lunar features.
  • Consider using a yellow filter to help reduce glare.
  • Record your observations through notes, sketches, or photography using a camera attachment or smartphone adapter.

To use a telescope and see the moon in all its glory, you need to ensure that your telescope has a diameter of at least 60 mm (2.4 inches). This will guarantee a clear and detailed view of the lunar surface. Once you have the right telescope, set it up on a sturdy tripod. This step is crucial to minimize vibrations and ensure the stability of your telescope, which in turn will provide a clearer view of the moon.

The next step is to find the moon in the night sky. The crescent or gibbous phases are the best for observing detailed views of the moon. Once you have located the moon, adjust the telescope’s focus by rotating the focuser knob. This will make the moon’s image appear sharp and clear.

Start your viewing experience with a low magnification, around 20-30x. Gradually increase the magnification to 100-200x for a more detailed view. Switching between eyepieces with different magnifications will allow you to observe various features on the moon’s surface, such as craters, mountains, and lava flows.

Make fine adjustments to the telescope’s altitude and azimuth controls. This will help you track the moon’s movement and maintain a clear view. To reduce the moon’s brightness and enhance the visibility of its surface features, use a moon filter or a neutral-density filter.

Avoid observing the moon when it is full, as the bright light can be overwhelming. Ensure that your telescope is properly collimated and that the optics are clean for a clear image. An astronomy app or moon chart can be helpful in locating and identifying lunar features.

Consider using a yellow filter to help reduce glare. Lastly, record your observations through notes, sketches, or photography using a camera attachment or smartphone adapter. This will allow you to look back on your viewing experience and compare your observations over time.


When is best time to look at the Moon with a telescope?

The best time to look at the moon through a telescope is during its crescent or gibbous phases, which occur 3-5 days after the new moon or 3-5 days before the full moon. During these phases, the moon’s surface is illuminated at an angle, creating long shadows that accentuate its topographic features such as craters, mountains, and valleys.

The illumination and shadows play a significant role in the best time to view the moon through a telescope. The low-angle sunlight during the crescent and gibbous phases creates a higher contrast between the bright and dark areas, allowing for a more detailed observation of the moon’s surface features. This period is ideal for studying the moon’s geology and observing its many fascinating features.

The optimal viewing conditions for looking at the moon with a telescope include observing when it is high in the sky to minimize atmospheric interference. Observing near the terminator provides the best view of surface details such as craters and mountains. Terminator is the line between the lit and dark portions of the moon.  The long shadows created by the low-angle sunlight enhance contrast, making these features more visible.

Specific lunar phases are better for viewing the moon with a telescope than others. The crescent phase is a good time to view the moon due to the shallow angle of sunlight, while the gibbous phase is ideal for observing detailed surface features. The full moon is the worst time for observation as there are no visible shadows, making surface features less distinct.

Seasonal considerations play a role in the best time to view the moon with a telescope. Late March is an optimal time of year due to the ecliptic’s steep angle with the horizon, pushing the moon higher in the sky for better viewing.


Is it safe to look at the Moon with a telescope during the day?

Looking at the Moon through a telescope during the day is a safe and enjoyable activity. The light reflected from the Moon is not harmful to the eyes, making it a popular object for daytime observation.

The brightness of the Moon can be overwhelming, especially when transitioning from a dark environment. To ensure a comfortable viewing experience, it is recommended to use a small telescope and filters to enhance the visibility of lunar details.

When using a telescope during the day, it is crucial to exercise caution to avoid accidentally looking at the Sun. Looking directly at the Sun through a telescope can cause serious eye damage. The best times to observe the Moon through a telescope are during its waxing and waning phases. During these phases, the sun’s angle creates shadows and highlights on the lunar surface, providing a more detailed view of the Moon’s features.


What telescope lens to use for moon viewing?

For a balanced view of the moon it is recommended to use a 20mm lens. 20mm lens offers both a good magnification and a wide field of view when observing the moon. This lens allows you to see the entire disc of the moon, providing a comprehensive view of our celestial neighbor.

Use lenses with shorter focal lengths (6mm or 13mm) for a more detailed observation of the Moon. These lenses provide higher magnification, allowing you to see the moon’s craters, mountains, and other geological features more closely. The magnification potential of your telescope depends on its aperture size. Experienced planetary observers use 20x to 30x magnification per inch of aperture to see the most detail.

A Barlow lens can be a valuable addition to your telescope kit. This type of lens can increase the magnification power by 2-3 times, allowing for a more detailed observation of the moon’s surface. When selecting a lens for moon viewing, prioritize factors such as focal length, aperture, and lens quality. High-quality lenses with minimal distortion and chromatic aberration can significantly improve your viewing experience. A magnification power of 50-100x is suitable for viewing the moon’s surface features.


Why does the full Moon look flat through my telescope?

Moon appears flat due to the lack of shadows and uniform illumination on the lunar surface during a full moon. The sun’s position, directly behind the observer, results in no shadows being cast on the moon’s surface, making it challenging to discern any topography or relief.

The moon’s rough surface does not reflect light evenly, further contributing to its flat appearance. The full moon’s brightness can make it uncomfortable to observe for extended periods, leading many observers to prefer other moon phases for telescopic viewing. Other phases of the moon provide a more dynamic and interesting view, as shadows create contrast, making lunar features such as craters and mountains more visible.

Another factor contributing to the moon’s flat appearance through a telescope is its relatively small angular size and the limited angular resolution of typical amateur telescopes. The moon subtends an angle of about 0.5 degrees (30 arcminutes) in the sky, and the angular resolution of a standard telescope is limited to around 1-2 arcseconds, depending on the telescope’s aperture and quality. The moon’s surface features are not resolved as distinct three-dimensional objects, appearing instead as a two-dimensional, flat disk.

The moon’s surface is relatively smooth on a large scale, and the lack of significant atmospheric distortion does not enhance the appearance of its topography. This is in contrast to observations of Earth or other planets with atmospheres, where the illusion of depth can make the surface appear more three-dimensional.

The phenomenon of “libration,” a slight wobble in the moon’s orbit, can make the full moon look elliptical or flat. Libration causes the moon’s axis to tilt , resulting in a subtle change in its apparent shape. The moon’s apparent shape can vary by up to 10% due to libration, making it appear more oval or flat when viewed through a telescope during a full moon. This effect is more pronounced when the moon is at its closest point to Earth (perigee) and less so when it’s at its farthest point (apogee). Therefore, the full moon may look different, even weak or like a different celestial body, when viewed through a telescope versus the naked eye.


Do you need a moon filter for your telescope?

A moon filter is not an absolute necessity when viewing the moon through a telescope. The moon shines less intensely than daylight and is not harmful to the eyes. Observing the moon can sometimes cause discomfort or glare due to its high brightness, especially during a full moon or when using telescopes with larger apertures.

Moon filters are a beneficial accessory in these situations. Filters serve to reduce the moon’s brightness, which can help minimize glare and enhance contrast, thereby making the viewing experience more comfortable. This is particularly true for telescopes with an aperture of 80mm or larger, where the increased light gathering capacity can make the moon appear excessively bright. Moon filters come in various types, including neutral-density filters and variable-polarizing filters. The latter allows for adjustable light reduction, providing more flexibility in managing the moon’s brightness.

Moon filters can significantly enhance the lunar viewing experience, but they are not essential. Filters are useful for telescopes with apertures above 60mm and magnifications above 100x, where the moon’s brightness can become overwhelming. By reducing the moon’s brightness to a more comfortable level, these filters allow for a more detailed and enjoyable observation of the moon’s surface.


Where to see live telescope view of the Moon?

There are several ways to see a live telescope view of the moon from the comfort of your own home.

One option is to check live streams on websites such as NASA TV, Virtual Telescope, and Space Telescope Live. These websites offer live feeds of the moon and other celestial objects, allowing you to observe the moon in real-time. You can use apps and online planetarium web applications to help you locate the moon and get a better view of it.

Another option is to connect a telescope to your computer. This will allow you to get a live view of the moon on your computer screen. To get the best view, it’s recommended to use low to medium power magnification, as the moon is very bright and may make it difficult to see other celestial objects in the same field of view.

If you’re looking for a more immersive experience, some observatories offer live broadcasts of the moon and other celestial objects. These broadcasts are available online or in-person, depending on the observatory. You can check the websites of local observatories to see if they offer live broadcasts and to find out more information about scheduling and availability.


What is the best telescope for moon photography?

The best telescope for moon photography is the Celestron NexStar 130SLT Computerized Telescope. NexStar 130SLT offers an ideal combination of aperture, focal length, optics, and camera compatibility, making it a top choice for capturing detailed images of the moon’s surface.

The Celestron NexStar 130SLT has a 130mm (5.12 inches) aperture, which allows for a larger amount of light to enter the telescope. This results in brighter and more detailed images of the moon. Its 650mm (25.6 inches) focal length is perfect for capturing high-magnification images of the lunar surface.

130SLT features high-quality glass optics with a high-transmission coating, ensuring that the images are sharp and clear. The high resolution of 0.89 arcseconds per pixel allows for detailed images of the moon’s craters, mountains, and other features.

The Celestron NexStar 130SLT is equipped with Celestron’s proprietary SkyAlign technology, providing accurate tracking and image stabilization. This ensures sharp images even at high magnifications. The computerized altazimuth mount allows for smooth and precise tracking of the moon’s movement, making it easier to capture sharp images.

The Celestron NexStar 130SLT is compatible with a variety of camera adapters, including Canon and Nikon DSLR cameras. This compatibility makes it easy to capture high-quality images of the moon. The telescope has a maximum magnification of 307x, allowing you to capture detailed images of the moon’s surface.

Celestron NexStar 130SLT costs around $500. NexStar offers excellent value for its performance and features. It comes with a database of over 4,000 celestial objects, making it easy to locate and track the moon and other celestial bodies.

For those looking for alternative recommendations, refractor telescopes with an apochromatic lens, such as the Takahashi FS-102 or the Astro-Physics 105mm f/5.9 Starfire EDT, are excellent choices. These telescopes offer exceptional optical quality, minimal chromatic aberration, and a wide, flat field of view, making them ideal for capturing high-contrast, detailed images of the moon’s surface.

In addition to a high-quality telescope, it’s essential to use a good camera and other equipment for moon photography. A high-quality DSLR or mirrorless camera with good low-light performance, such as the Canon EOS 6D Mark II or the Sony Alpha a7R IV, is recommended. A sturdy equatorial mount is necessary for smooth, precise tracking. Using a high-precision focuser ensures accurate focus and minimizes camera shake. A lunar filter can help reduce the moon’s brightness and prevent overexposure, while a remote shutter release can minimize camera shake and ensure sharp images. Shooting in RAW format allows for better post-processing and capturing more image data.


How to take moon pictures with a telescope?

To take moon pictures with a telescope, follow the steps listed below.

  • Set up your telescope properly, ensuring it’s assembled correctly and the tripod is sturdy and level.
  • Use a refractor or reflector telescope with an aperture of at least 60mm (2.4 inches) for optimal lunar photography.
  • Choose a DSLR or mirrorless camera, or a smartphone with a telescope adapter, with manual focus and exposure control.
  • Attach your camera to the telescope using a T-ring or a compatible telescope adapter.
  • Focus on the moon using the telescope’s focuser, adjusting the distance and rotation as needed.
  • Adjust your camera settings to Manual mode, with an ISO of 100-400, a shutter speed of 1/100s to 1/1000s, and an aperture of f/8 to f/16.
  • Set the white balance to Daylight or Auto to capture the moon’s natural color.
  • Take multiple shots of the moon at different focus points and exposure settings.
  • Consider using image stacking software to combine multiple frames for enhanced image quality.
  • Use a remote shutter release or set a timer of 2-3 seconds to minimize camera shake.
  • Use image editing software to adjust the brightness, contrast, and color balance of your pictures.
  • Shoot in RAW format for better post-processing flexibility.
  • Use a moon filter to reduce the moon’s brightness and prevent overexposure.
  • Capture images during the First Quarter or Last Quarter phases, when the moon’s illumination is around 50%.
  • Be patient and practice refining your technique to take stunning moon pictures with your telescope.

Start by setting up your equipment properly. Ensure your telescope is assembled correctly and the tripod is sturdy and level. A refractor or reflector telescope with an aperture of at least 60mm (2.4 inches) is recommended for optimal lunar photography. Next, choose the right camera for filming the moon. A DSLR or mirrorless camera is ideal, but you can use a smartphone with a telescope adapter. Make sure your camera has manual focus and exposure control to achieve the best results.

Attach your camera to the telescope using a T-ring or a telescope adapter compatible with your specific models. Focus on the moon using the telescope’s focuser, adjusting the distance and rotation as needed to bring the moon into sharp focus. Adjust your camera settings to Manual mode, with an ISO of 100-400 to minimize noise, a shutter speed of 1/100s to 1/1000s to freeze the moon’s motion, and an aperture of f/8 to f/16 for increased detail. Set the white balance to Daylight or Auto to capture the moon’s natural color.

Take multiple shots of the moon at different focus points and exposure settings to increase your chances of capturing a high-quality image. Consider using image stacking software to combine multiple frames for enhanced image quality. To minimize camera shake, use a remote shutter release or set a timer of 2-3 seconds before taking the picture.

Use image editing software to adjust the brightness, contrast, and color balance of your pictures. Shooting in RAW format provides better post-processing flexibility, allowing for improved noise reduction and detail enhancement.

Use a moon filter to reduce the moon’s brightness and prevent overexposure. Capture images during the First Quarter or Last Quarter phases, when the moon’s illumination is around 50%. Be patient and practice refining your technique to take stunning moon pictures with your telescope.