How to Make Solar System Diorama Project
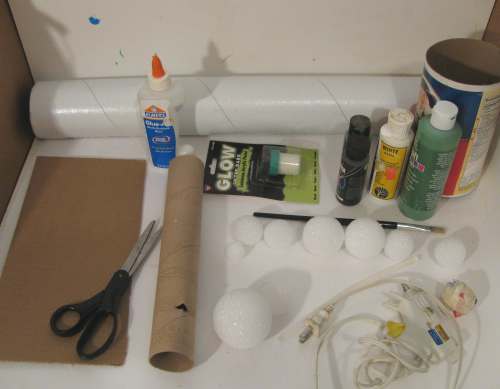
To create a solar system diorama, a set of specific steps and materials are required. The first step involves gathering the necessary materials, which primarily include a shoebox and styrofoam balls. The shoebox will serve as the container for the diorama, while the styrofoam balls will represent the different planets.
Conduct research on the sizes of the planets and their relative distances from the sun. This step ensures that the diorama will be an accurate representation of the solar system. It is recommended to use reliable sources for this research to ensure the accuracy of the information.
Sketch a layout of the diorama on paper. This step allows for visualization of the placement of the planets within the shoebox. It also serves as a guide during the assembly process, ensuring that the planets are placed in their correct positions relative to the sun.
Create the planets, after the layout has been sketched. The styrofoam balls are painted to resemble the actual planets, with attention to detail to ensure they are as accurate as possible.
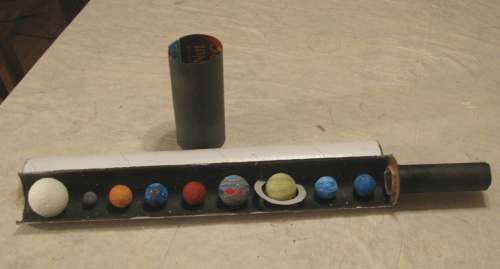
The final step in creating a solar system diorama is the assembly. Assembly involves placing the painted planets into the shoebox according to the sketched layout. The sun is placed at the center. The planets should then be placed around the sun, with their distances from the sun being accurate according to the research conducted. Once all the planets are in place, the solar system diorama is complete.
How to make a solar system diorama?
To make a solar system diorama, follow these 5 steps.
- Gather materials (shoebox and styrofoam balls).
- Research the planets’ sizes and relative distances from the sun.
- Sketch a layout on paper to visualize the placement.
- Create the planets.
- Assemble the diorama.
1. Gather materials (shoebox and styrofoam balls).
Gather the primary materials required for constructing solar system diorama. Materials include a shoebox or rectangular box, which will serve as the foundation for your project. Shoebox should be approximately 5-7 inches long, 3-5 inches wide, and 2-3 inches tall. To represent the planets, you will need styrofoam balls of various sizes.
For Mercury, use a 1-inch diameter ball for Mercury; a 1.5-inch diameter ball for Mars; 2-inch diameter balls for Venus and Earth, 2.5-inch diameter balls for Neptune and Uranus; a 3-inch diameter ball for Saturn; and a 4-inch diameter ball for Jupiter. You need paper or foam board to create the background and any additional features, such as the sun, asteroids, or a comet.
You require several essential supplies to assemble and customize your solar system diorama. Supplies include paint and paintbrushes for coloring and detailing the planets and background, as well as glue (hot glue, white glue, or super glue) for assembling the diorama. Scissors will be necessary for cutting paper, foam board, or other materials, and a ruler or straightedge will help you measure and draw straight lines. Markers or colored pencils will allow you to add details and textures to the planets. You need string, wire, or invisible thread to hang the planets within the diorama.
There are optional items that can enhance the appearance and realism of your solar system diorama. Watercolor or tempera paint can create a more realistic, gradient-effect background, while cardboard or paper tubes can be used to create the sun or other celestial bodies. Aluminum foil or metallic paint can add a reflective, metallic finish to the planets. A small LED light or glow-in-the-dark paint can create a glowing effect for the sun or stars. Glitter or sequins can provide added texture and shine, while yarn or string can be used to create orbits. Small rocks or beads can represent asteroids or moons, further enhancing the detail of your diorama.
2. Research the planets’ sizes and relative distances from the sun.
Choose an appropriate scale for your diorama. A common scale for a shoebox-sized diorama is 1:10 billion, where one centimeter on the model represents 10 billion centimeters (100,000 kilometers) in real life. This scale allows for a reasonable size for the sun and planets while maintaining accurate relative distances.
Calculate the sizes and distances of the planets based on the chosen scale. For the sun, its diameter is 1,392,684 km, which translates to a scale diameter of 13.93 cm. For Mercury, its diameter is 4,879 km (scale diameter: 0.048 cm), and its average distance from the sun is 57,909,227 km (scale distance: 57.91 cm). Similarly, calculate the scale diameters and distances for Venus, Earth, Mars, Jupiter, Saturn, Uranus, and Neptune using their actual diameters and average distances from the sun.
3. Sketch a layout on paper to visualize the placement.
Place the Sun at the center of your diorama, as it is the largest object in our solar system. Draw a circle with a diameter of about 5-7 cm (2-3 inches) to represent the Sun. To make it more engaging, add simple details like sunspots or solar flares around the Sun. This step will help kids visualize the Sun’s appearance in a creative manner.
Arrange the planets in order from the Sun, using approximate distances and sizes. Start with Mercury, which should be 0.4 cm (0.16 inches) in diameter and 2 cm (0.8 inches) from the Sun. Continue with Venus, Earth, Mars, Jupiter, Saturn, Uranus, and Neptune, maintaining the proper distances and sizes. This step will give kids a better understanding of the planets’ relative positions and sizes in our solar system.
Consider adding other features to your diorama to make it more visually appealing and informative. Include an asteroid belt between Mars and Jupiter with small, scattered circles, and a Kuiper belt beyond Neptune with more small circles. You can add comets with small, elongated shapes and tails, as well as stars represented by small, scattered dots in the background. These additional elements will help kids learn about other celestial bodies in space.
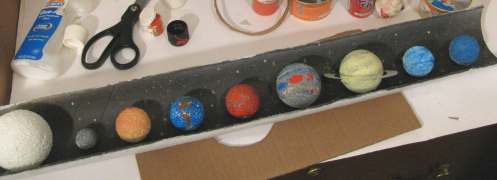
4. Create the planets.
Start with Mercury by using a small Styrofoam ball or marble and painting it grey. For Venus, create a sphere from paper mâché or use a small foam ball, and paint it white. Earth can be made from a small blue Styrofoam ball or blue marble; be sure to paint green and blue for the continents and oceans. Use a sphere from paper mâché or a small foam ball to create Mars, and paint it reddish-brown.
Make Jupiter with a large Styrofoam ball or balloon, and paint it with orange, white, and brown bands. Use a large foam ball or paper mâché sphere, for Saturn paint it yellow and brown, and add rings made from CDs or cardboard. Uranus can be created with a small Styrofoam ball or blue marble, painted blue-green. Make Neptune using a sphere from paper mâché or a small foam ball, and paint it deep blue.
Use paints and markers to accurately depict the colors and features of each planet. Use textures like felt or fabric for a more realistic surface. Consider including additional details such as craters, mountains, or rings using small objects like beads or sequins.
With your planets decorated, it’s time to assemble your solar system diorama.
5. Assemble the diorama.
Use strings or glue to secure the planets at their correct distances from the Sun. Ensure that the planets are in a straight line or curved to represent their orbits. Consider adding labels for each planet and component in your diorama for added clarity.
What materials and supplies are needed to make a solar system diorama?
The base of the diorama can be made from a simple shoe box or a rectangular plastic container, providing a sturdy foundation for the rest of the project.
Styrofoam balls or paper maché balls of various sizes are needed for the planets. Spheres serve as the base for each planet, allowing for customization and accuracy in size.
Acrylic or tempera paint in various colors and paintbrushes are essential. These tools allow for the detailed painting of each planet, ensuring they resemble their real-life counterparts.
Black construction paper or black paint can be used to create the dark, space-like backdrop. This contrasts with the vibrant colors of the planets, making them stand out.
Attachment materials such as wooden skewers, dowels, pipe cleaners, wire, or string are needed to suspend the planets in their respective orbits. These materials ensure the planets are securely held in place while allowing for the necessary distance between each one.
Adhesives like hot glue, white glue, or school glue, and tape are crucial for assembling the diorama. They ensure that all elements of the project remain securely in place.
Cutting tools such as scissors, craft knives, or hobby knives are necessary for making precise cuts and shaping materials. These tools are essential for creating the various elements of the diorama, from the planets to the background.
Detailing tools like markers, colored pencils, and chalk can add finer details to the planets and other elements of the diorama. These tools can be used to create features like the Great Red Spot on Jupiter or the rings of Saturn.
Optional extras can enhance the diorama’s visual appeal and educational value. An LED light or glow-in-the-dark paint can be used to represent the Sun, while materials like cardboard or plastic can be used to create Saturn’s rings. Cotton balls or white glue can create a sense of cloudiness or nebulae, and a small motor or battery-operated device can create a rotating effect for the planets.
What is a good solar system diorama kit?
A solar system diorama kit is a tool for kids to explore the wonders of our celestial neighborhood in a creative and engaging manner. Kits include styrofoam balls that represent the planets, along with materials like bamboo sticks, paint, and brushes to decorate and assemble the model. Many popular kits feature items such as glow-in-the-dark paint, hanging frames or strings, and instructional guides to enhance the learning experience.
Motorized kits set the planets in orbital motion around the sun, providing a more dynamic and interactive model. Reputable brands such as 4M, Thames & Kosmos, Elmer’s, Curious Kids, and Kalakaram offer a range of kits from basic to comprehensive, including specialty paints, display bases, fact guides, and more.
When selecting a solar system diorama kit, it’s essential to match the kit to the age and skill level of the child. A good kit will include the core planet components, with additional extras like paints, guides, and mobility features that can enhance the educational value and visual appeal.
The 4M Solar System Diorama Kit is an excellent choice for kids aged 6-12. This kit encourages creative learning and construction skills, with pre-cut paper models of the planets, sun, and other celestial bodies. It includes a shoebox-sized diorama base and other materials, allowing kids to create a 3D representation of our solar system while learning about the relative sizes and positions of the planets.
Other recommended kits include the National Geographic Solar System Diorama Kit, the Thames & Kosmos Solar System Diorama Kit, the Incredible Science Solar System Diorama Kit, and the Solar System Diorama Kit by Learning Resources. These kits offer various features and are suitable for different age groups.