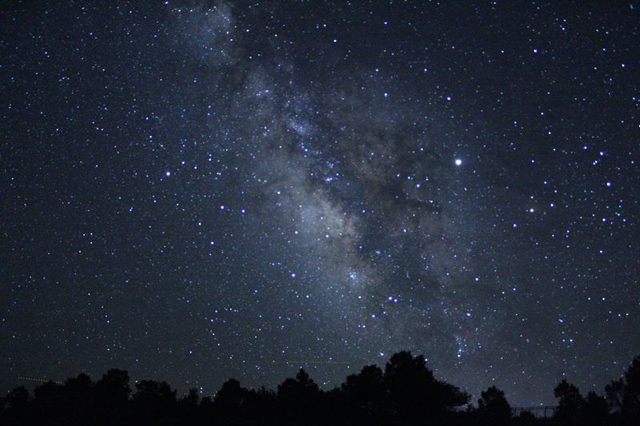
How did they take a picture of the Milky Way? (and How To Do it Yourself)
Scientists use various techniques to create an accurate representation of our galaxy. One method is called deprojection. Deprojection estimates the 3D structure of the galaxy by analyzing the motions and distributions of stars and gas.
Scientists use powerful telescopes like Hubble, Chandra, and Spitzer to capture images of different wavelengths across the Milky Way. The Event Horizon Telescope collaboration produced the first image of the supermassive black hole at the center of our galaxy in 2022. Scientists compare the Milky Way to other galaxies using comparative analysis and techniques like gravitational lensing to reconstruct its formation history.
To take Milky Way photos yourself, follow these eight steps: find a dark location with minimal light interference, prepare photography equipment, open the aperture as wide as possible, increase ISO to a range of 3200-6400, set shutter speed, set a white balance around 3000-4000 Kelvin for a natural look, use manual focus, and capture photos of the Milky Way.
How did scientists take a picture of the Milky Way?
Scientists use powerful telescopes, such as Hubble, Chandra, and Spitzer, to take images of different wavelengths across the Milky Way. These multi-wavelength observations provide valuable data that helps map the galaxy’s structure and composition.
Mapping techniques combine various observations across the electromagnetic spectrum to build a comprehensive picture of the galaxy’s structure and evolution over billions of years. Scientists took a significant step forward in this regard by combining data from NASA’s Spitzer Space Telescope and the European Space Agency’s (ESA) Gaia spacecraft in 2016.
The Gaia spacecraft mapped the stars in the Milky Way galaxy, observing the position, motion, and brightness of over 1 billion stars using astrometry. This process involved taking precise measurements over a period of 22 months, from July 2014 to May 2016.
Spitzer Space Telescope observed the Milky Way in infrared light, capturing over 2 million images that were then combined to create a mosaic of the galaxy. By merging the data from Gaia and Spitzer, scientists were able to create a detailed and high-resolution image of the Milky Way.
Gaia released a stunning 360-degree panorama showcasing the Milky Way’s intricate structure in 2020, featuring over a billion stars and covering an area of 360 x 180 degrees on the sky.
The Spitzer Space Telescope’s GLIMPSE (Galactic Legacy Infrared Mid-Plane Survey Extraordinaire) survey is an example of how researchers get pictures of the Milky Way. The survey took over 840,000 individual photos of the galaxy’s central region between 2003 and 2009, which were then stitched together to create a 360-degree panorama of the central 130 degrees.
How to take Milky Way photos?
To take Milky Way photos, follow these 7 steps.
- Find a dark location with minimal light interference.
- Prepare photography equipment.
- Open the aperture as wide as possible.
- Increase ISO to a range of 3200-6400.
- Set shutter speed.
- Set a white balance around 3000-4000 Kelvin for a natural look.
- Use manual focus.
1. Find a dark location with minimal light interference.
Travel at least 20-30 miles (32-48 kilometers) from cities and towns to minimize light pollution, which can hinder your ability to take clear pictures of the galaxy. Utilize resources like Dark Site Finder or Light Pollution Map to identify areas with minimal artificial light, ensuring the best conditions for your photography session.
When searching for an ideal location, aim for areas with a Bortle Scale rating of Class 2 or lower. The Bortle Scale measures the darkness of the night sky, and a lower rating indicates optimal darkness for capturing the Milky Way. Seek out dark-sky preserves or sanctuaries listed by the International Dark-Sky Association, as these designated areas are protected for their exceptional darkness.
Plan your photography sessions during the new moon phase or when the moon is in its crescent phase to avoid moonlight interference. A full moon washes out the faint light of the Milky Way, making it difficult to capture a clear picture. Scout locations for potential obstructions, looking for wide open areas with unobstructed views of the southern horizon. Avoid trees, buildings, or hills that could block your view of the galaxy.
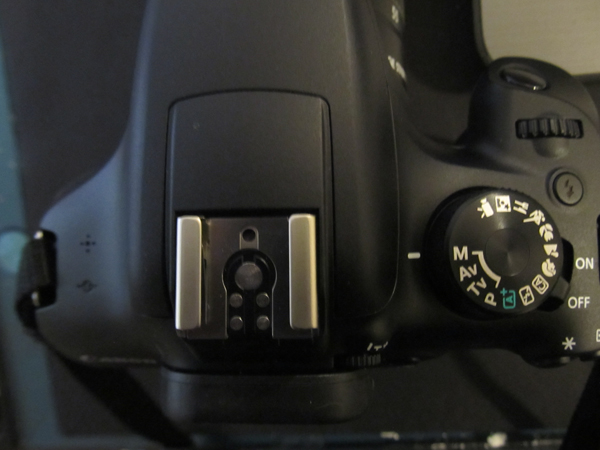
2. Prepare photography equipment.
Prepare a DSLR or mirrorless camera, such as a Canon EOS 6D, or a smartphone like an iPhone or Android device (e.g., Samsung).
Use a sturdy tripod to prevent any camera shake, which can result in blurry images. A tripod with a ballhead or panhead makes it easier to adjust the camera’s position to frame the Milky Way. Additionally, using a remote shutter release or the camera’s self-timer minimizes camera shake when taking photos.
Consider using a telescope to capture more detailed photos of the Milky Way. Telescopes help you zoom in on specific regions of the galaxy, allowing for a more professional and in-depth look at our cosmos.
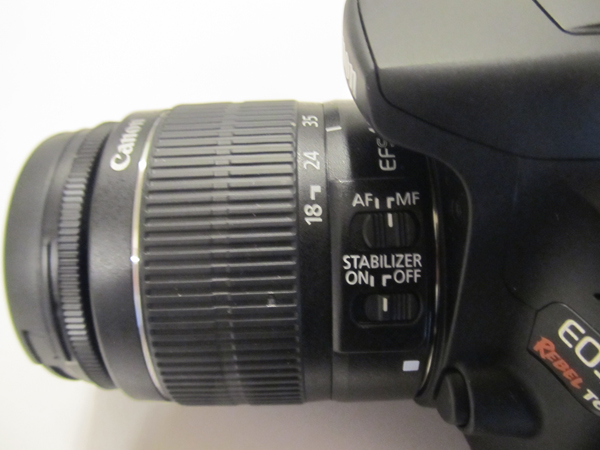
3. Open the aperture as wide as possible.
Switch your camera to Manual (M) mode. This mode allows you to take full control over the camera settings, ensuring the best possible results. If you’re using a smartphone, look for a Pro mode or manual settings in your camera app.
Set the aperture to its widest setting, represented by the lowest f-stop value. This value could be f/1.4, f/1.8, or f/2.8, depending on your lens. A wider aperture allows more light to enter the camera, making the stars in the Milky Way appear brighter and more defined in your photos.
Using a wide-angle lens with a focal length around 14-24mm is highly recommended for Milky Way photography. Ensure the lens has a maximum aperture of at least f/2.8; f/1.8 or f/1.4 is even better if your lens allows it. Wide-angle lenses help capture more of the night sky, allowing you to take breathtaking Milky Way pictures.
4. Increase ISO to a range of 3200-6400.
Adjust the ISO setting on your camera to take high-quality Milky Way photos. Start with an ISO of 3200 and take a few test photos. If the image appears too dark, increase the ISO to 4000 or 5000. Be cautious not to introduce excessive noise in the image. If you want to capture more detail in the Milky Way’s core, push the ISO to 6400.
Shooting in RAW format is recommended when taking Milky Way photos. RAW format provides more flexibility during post-processing and allows for better noise reduction. After taking multiple photos, use image editing software like Adobe Lightroom to combine the images into a single, noise-reduced picture of the Milky Way. This technique is called image stacking and helps reduce the noise introduced by high ISO settings.
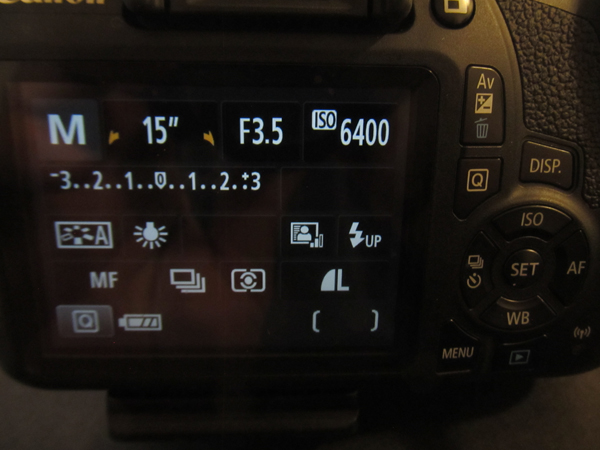
5. Set shutter speed.
To take stunning photos of the Milky Way with a DSLR camera it’s essential to choose the right shutter speed to capture pinpoint stars without trailing. Photographers use the “500 rule” or the “NPF rule” to calculate the maximum shutter speed before stars start trailing. By dividing 500 (or 300 for crop sensor cameras) by the lens’ focal length, you can obtain the maximum speed in seconds. For instance, using a 20mm lens on a full-frame camera results in a maximum shutter speed of 25 seconds (500/20).
Shutter speeds around 10-30 seconds are recommended for Milky Way photography. Wide-angle lenses, in particular, benefit from shutter speeds within the 10-30 seconds range. For a Canon DSLR, a good starting point would be a shutter speed of 20-25 seconds. This range allows you to freeze the stars and capture the Milky Way’s details without significant star trailing. Adjust the shutter speed based on your specific lens and camera sensor size. For a 10-14mm lens at f/2.8 or wider, use a shutter speed of 20-25 seconds. For a 14-24mm lens, use 15-20 seconds, and for a 24-35mm lens, use 10-15 seconds.
6. Set a white balance around 3000-4000 Kelvin for a natural look.
Access the White Balance menu and select “K” (Kelvin) as the white balance mode. Dial in a value between 3000K and 4000K to capture the Milky Way’s natural hues. Take a test shot and adjust the Kelvin value as needed to achieve the desired color balance.
Open the Camera app and go to Settings, if you’re using an iPhone. Tap on “White Balance” and select “Custom”. Tap on “Kelvin” and enter a value between 3000K and 4000K using the slider or manually. This range brings out faint reds, blues, and other colors in night sky objects, avoiding making the image look too warm or cool.
For Samsung and other Android users, open the Camera app and go to Settings. Tap on “White balance” or “WB” and select “K” (Kelvin) as the mode. Use the slider to enter a value between 3000K and 4000K. This range is a good starting point for getting an accurate white balance for astrophotography.
7. Use manual focus.
Switch your camera to Manual Focus (MF) mode. This allows you to control the focus manually, using the lens’s focus ring. Autofocus struggles in low light conditions, making manual focus essential for Milky Way photography.
Enable Live View mode on your camera. Live View will magnify the image on the LCD screen, helping you accurately focus on the stars. Zoom in on a bright star or distant light source using the camera’s zoom button or the lens’s zoom ring. Adjust the focus ring until the star appears as a sharp pinpoint.
Set the focus ring to the infinity (∞) mark, once you’ve focused on a bright star. You need to fine-tune the focus by setting the focus ring just before infinity. Take test photos and zoom in on the LCD screen to check the focus. Make small adjustments to the focus ring if necessary until the stars appear tack sharp.
Can I use iPhone to take picture of the Milky Way?
Absolutely, you can take a picture of the Milky Way with an iPhone, specifically with models from iPhone 11 and later. Apple’s Phones come equipped with a Night mode feature that significantly enhances low-light photography, making it possible to capture the faint light of the Milky Way.
Can I use Samsung phone to take pictures of the Milky Way?
Absolutely, you can take stunning photos of the Milky Way with a Samsung phone. Many Samsung Galaxy series phones, such as the S21 Ultra, Note 20 Ultra, and A72, boast excellent camera capabilities that can capture the beauty of our galaxy. These Android devices come equipped with features like Pro mode, Night mode, and apps like Expert RAW, which provide more control and RAW file output, enhancing your ability to take impressive Milky Way photos.
